Home Decor

Creative Ideas to Transform Your Welcome Inn Paper Pumpkin Kit

Here’s an alternative project I made using the June 2023 Welcome Inn Paper Pumpkin Kit. It’s a fun-fold card using elements from the kit. I loved the printed card bases in this kit! To find out more about Paper Pumpkin and how to obtain a kit click here.

I used parameters from last week’s #craftroulettechallenge to create the card. Are you familiar with Craft Roulette? It’s a weekly live show featuring improvised crafting, special guests, community contributions, tons of prizes, and much, much more! The Craft Roulette wheel decides what the project will be and what elements to use. The parameters for this card were:

  • Project = 2 Folds
  • Colors = Planter
  • Element = Happy Face
  • Random = An Old Product

I think I nailed it with my 2-fold fun-fold card, Calypso Coral color, old brad and baker’s twine and the happy face I stamped with the sentiment inside the card.

I’ll be a guest crafter on Craft Roulette this Friday, July 14, and would love for you to join us. Cheer me on and create your own project! Find out all about it by clicking on this link then plan to watch it Friday at 6:30 pm CT: https://craftroulette.live/

Video Tutorial

Make an Irresistible Blooms 3-D Flowering Watering Can

I made these sweet Irresistible Blooms 3-Dimensional Watering Can party favors for the attendees of my June Card Parties. I used the Irresistible Blooms Bundle and coordinating Hello, Irresistible Designer Series Paper to make the cans. The dies from the Irresistible Blooms Dies cut images from the paper so the only stamping I did on this project was the “hello” sentiment tag. I love it when Stampin’ Up! does that!

Cutting & Scoring Guide

  • Watering Can Base = 8-1/2″ x 4-1/2″ piece of cardstock scored at 1/2″, 1-1/2″, 4-1/2″ and 5-1/2″ on the 8-1/2″ side. Scored at 1″ on the 4-1/2″ side.
  • Watering Can Spout = two 2-1/2″ x 3/4″ pieces of cardstock.
  • Watering Can Side Handle = two 3″ x 2″ pieces of cardstock.
  • Inside Platform = 4″ x 1/2″ scored at 1/2″ on both ends.
  • Watering Can Top Handle = 8″ x 1/2″

Video Tutorial

Product List
Layering Ovals Dies
Layering Ovals Dies

Make a Dollar Tree Valentine Apothecary Jar

Today’s project is a fun, Valentine Apothecary Jar that I made using supplies from Dollar Tree. I purchased these small, plastic mason jars at my local Dollar Tree. I have also seen plastic apothecary jars in the Dollar Spot at Target which would be perfect for this project.

Make these easy jars for table favors, home decor, and coworker gifts. Use different colors for the embellishments and they would be beautiful for a wedding shower. I plan on using them as decoration on my treat table at my Galentine’s Card Party. If you’re local to the Kansas City area we would love to have you join us. See the party details by clicking on this link: https://bit.ly/3wW7om5

Product List
Heart Punch Pack
Share A Milkshake Bundle (English)
Country Bouquet Photopolymer Stamp Set (English)
Real Red Classic Stampin' Pad
Polished Pink Classic Stampin' Pad
Stamping Sponges
Balmy Blue 8-1/2" X 11" Cardstock
Real Red 8-1/2" X 11" Cardstock
Polished Pink 8 1/2" X 11" Cardstock
Basic White 8 1/2" X 11" Cardstock
Baker's Twine Essentials Pack
Heat Tool (Us And Canada)
Mini Stampin' Cut & Emboss Machine
Multipurpose Liquid Glue
Mini Stampin' Dimensionals

Make a Cottage Wreaths Mini Cutting Board for Fall Decor

I stumbled across mini cutting boards during a recent visit to Hobby Lobby. Of course, I had to make something using them and here is the result:

I painted the 3-1/2″ x 7″ natural wood cutting boards with white spray paint and then embellished them using the Rustic Harvest Designer Series Paper and the Cottage Wreaths Bundle from Stampin’ Up!

Product List

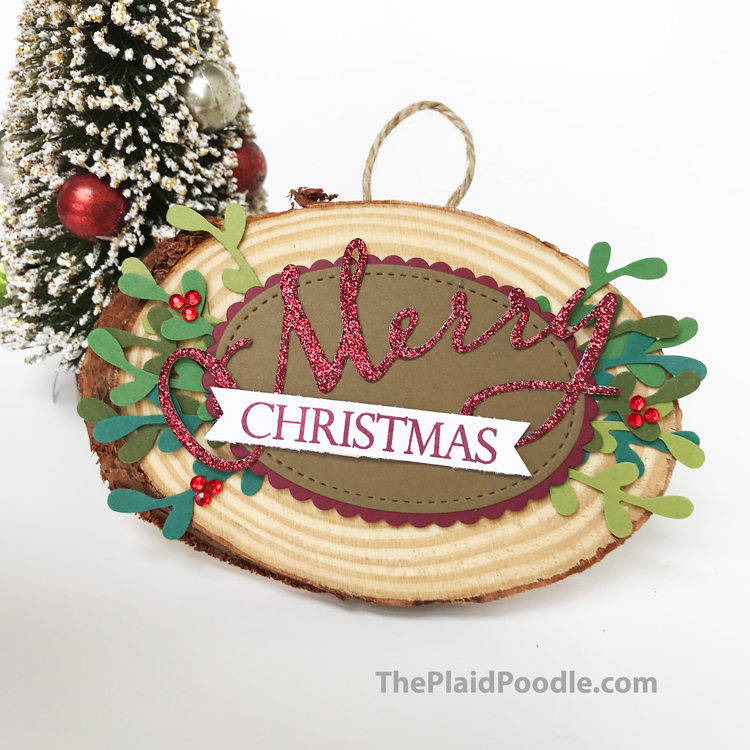
Merry Christmas to All DYI Ornament

The trend right now in home decor, fashion and crafts is Farmhouse Chic.  I always make a handmade gift for the guests who attend my Christmas Fun & Fancy Classes and wanted to do something this year using the trend.  I ended up making this ornament for my guests.  The idea came from another Stampin’ Up! Demonstrator who made a larger, plaque version.  Unfortunately I cannot find the name of that Demonstrator to give her proper credit.

I used a traditional stamp set and Thinlits bundle – Merry Christmas to All.  This is a classic bundle that will stand the test of time and stay in my craft room for years to come.  I love that the Framelits include tag dies that fit perfectly around the word images.

I created the DYI ornament on this week’s Coffee & A Card Facebook Live.  I meet with everyone live each Wednesday morning at 11 am CST on my Facebook Page and we craft together.  Make sure you “Like” and “Follow” my page here so you don’t miss an episode.

Here is an edited version of the video tutorial that includes all the dimensions:


Product List

Wicked Good Wreaths

Changing up a few things around my home with the seasons is something I enjoy doing but without a lot of time I keep it simple.  One of the easiest ways to update home decor with the changing seasons is with wreaths. Take one down and replace with another – even I have time for that.  And  what is better than a beautiful home decor piece?  Saying, “I made that” to your family and friends!

The Fancy option In my Fun & Fancy Class yesterday was the Season to Season Wreath Project Kit.  I was a little worried that our class time would not be adequate to finish the wreath but it was surprisingly easy to put together and my guests left with completed wreaths.  Happy guests and a big sigh of relief from me!

The wreath is so pretty with a soft, vintage feel and will look great wherever I decide to place it.  The finished size is pretty substantial – about 15″.  And – bonus – it is good to go until New Year’s because of the three interchangeable banners; Halloween theme, Autumn/Thanksgiving theme and Christmas theme.  Mine is all decorated for Halloween and looks great hanging on the $5 wreath holder I made last Fall.  See instructions for that HERE

Holiday15_p06_b

The supplies to make your own Season to Season Wreath are:

Built for Free Using: My Stampin Blog

Another fun option for Halloween decorating is the Frightful Wreath Simply Created Kit. It is currently on the Clearance Rack while supplies last.  The coordinating stamp set is not available but the Happy Haunting sentiment from the Cheer All Year Stamp Set would substitute in great!

Frightful-Wreath-on-Stand

I would love to hear from you about your seasonal decorating!  Do you change it up a little or a lot or not at all?  Do you decorate for Halloween?  Leave a comment and let me know.  Thanks!


Painted Blooms

Painted-Blooms-800-x-401We had the most wonderfully extraordinary weather in Kansas City last week!  It was sunshine, blue skies and pull out the flip-flops weather.  It’s not a secret I’m no cold-weather fan and the temps we experienced last week put a smile on my face that has yet to disappear.  I held a Girl’s Night Out Stamp & Scrap on Friday night and wanted so much to have flowers in my pots on the front porch to greet the gals.  Reality check . . . it’s only March 17th!  Even though it’s too early to plant the real thing, the Painted Blooms Designer Series Paper from Stampin’ Up! can help a girl dream!

These designer series papers were designed and painted by an actual artist before they were produced for paper craft use.  Believe me when I say these beauties are special!  Before I cut into one sheet of this gorgeous paper I actually copied the idea from the Occasions Catalog and framed one 12 x 12 sheet then hung it on a wall in my house. I’m planning some other projects using this paper along with the coordinating stamp set, Painted Petals, so check back for those. Here’s a video showing how quick and easy it was to use this paper as home decor.


Shop With Me!