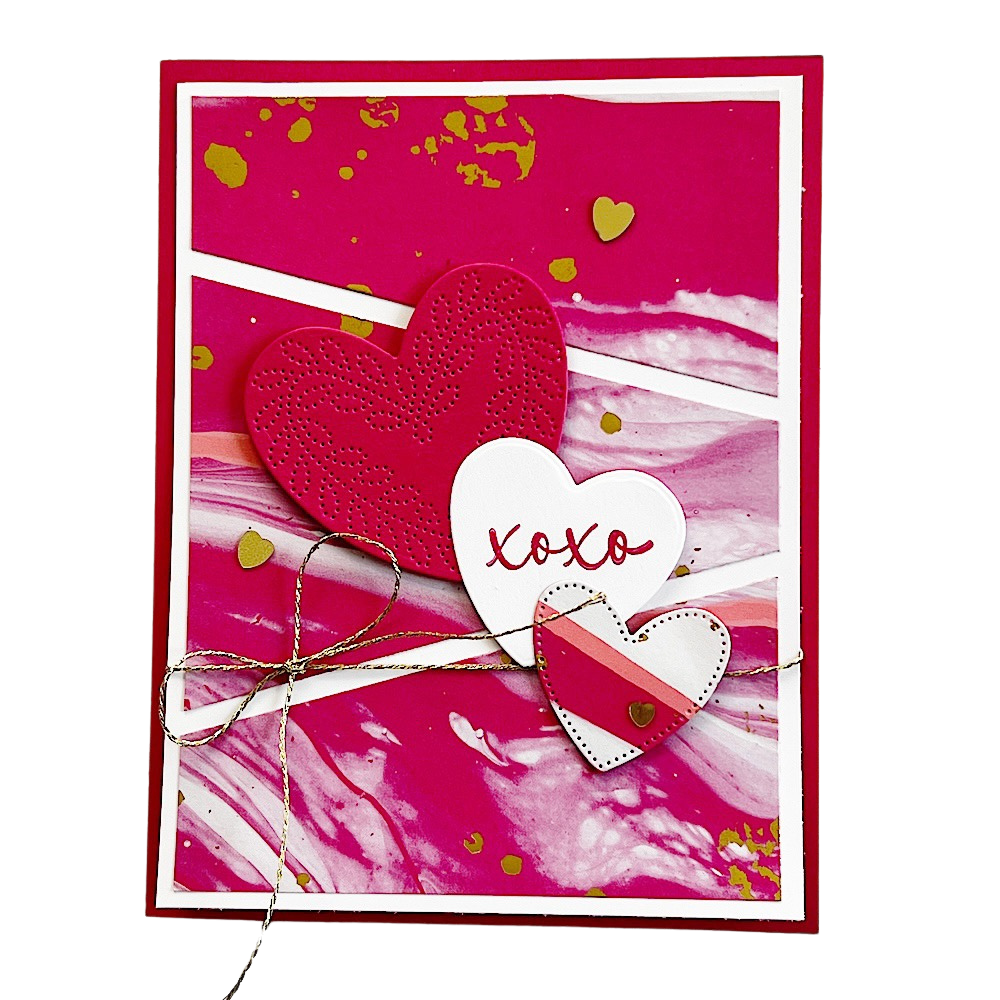
Latest Posts

Make a Framed & Festive Pop-Up Gift Card Holder

Gift cards are fantastic, especially for those hard-to-buy-for people on your Christmas list! Today’s project is an easy pop-up gift card holder made using the Framed & Festive stamp set and Double Oval Punch from Stampin’ Up!

The pop-up pocket in the card is simple to achieve but elevates the holder a bit. I used one of my favorite prints from the Celebrate Everything Designer Series Paper pack and created a belly band to keep the holder closed. Finally, I embellished the belly band with Gold Shimmer ribbon and an oval tag I stamped with a sentiment from the Framed & Festive stamp set.

The Shaded Spruce card base measures 4-1/4″ x 7-3/8″ and is scored at 2-3/4″ and 5-1/2″ on the 7-3/8″ side. The Designer Series Paper insert measures 4″ x 9-5/8″ and is scored at 1-3/4″, 4-1/2″, 5-3/4″ and 7″ on the 9-5/8″ side. The two remaining pieces of Designer Series Paper for the outside flaps of the gift card holder measure 4″ x 2-1/2″ and 4″ x 1-1/2″. For complete directions watch this video tutorial:

Product List
Framed & Festive Cling Stamp Set (English)
Sweet Sorbet Classic Stampin' Pad
Celebrate Everything 12" X 12" (30.5 X 30.5 Cm) Designer Series Paper
Shaded Spruce 8-1/2" X 11" Cardstock
Basic White 8 1/2" X 11" Cardstock
Simply Scored
Double Oval Punch
Gold 3/8" (1 Cm) Shimmer Ribbon
Multipurpose Liquid Glue

Stampin’ Up! Product Gift Certificates

This time of year is a great time to mention the availability of gift certificates. Grab one for all your crafty friends and one for yourself to use later, when new Stampin’ Up! products are released.

Details:

  • Gift certificates will be emailed to the email address provided within 24-hours of receipt.
  • This gift certificate cannot be used for online orders. Orders can only be placed via email to leslie@theplaidpoodle.com
  • Should your order exceed the amount of the gift certificate you may pay the remaining balance using a credit/debit card. All balances must be paid in full before the order can be placed.
  • Gift certificates purchased through The Plaid Poodle are only redeemable through The Plaid Poodle. Funds received are being held waiting for redemption.
  • Gift certificates are valid for 365 days from the date of purchase. Purchase dates will be verified.
  • Gift certificates must be used in their entirety. No partial orders can be accepted.
Denomination

12 Weeks of Christmas Penguin Treat Box

Twelve Weeks of Christmas Week #8

It’s week eight of my new Twelve Weeks of Christmas series! Each week throughout the season I will be posting a new project with full-color instructions for you to download and print for your paper crafting library! And, new this year, I’ll be including a video tutorial to go along with every Twelve Weeks project!

Today’s project is this Penguin Treat Box:

Click on the button below to view the full-color, step-by-step instructions. Feel free to download and print for your personal use.

Video Tutorial

Product List

12 Weeks of Christmas Snowman Magic Gift Tag

Twelve Weeks of Christmas Week #7

It’s week seven of my new Twelve Weeks of Christmas series! Each week throughout the season I will be posting a new project with full-color instructions for you to download and print for your paper crafting library! And, new this year, I’ll be including a video tutorial to go along with every Twelve Weeks project!

Today’s project is this Snowman Magic Gift Tag:

Isn’t that sleepy snowman the cutest? Click on the button below to view the full-color, step-by-step instructions. Feel free to download and print for your personal use.

Video Tutorial

Product List

Make some Sweet Candy Canes Package Toppers

The project I’m sharing with you today is these heart-shaped candy cane package toppers.

I used two bundles for the candy cane package toppers: the Sweet Candy Canes bundle and the Christmas Banners bundle.

The Sweet Candy Canes package toppers are simple to make. I used two candy cane die-cuts adhered together and then embellished with elements from the Christmas Banners bundle. However, there is a trick to it, so watch the video tutorial for complete instructions.

Product List

12 Weeks of Christmas Candy Cane Shaker Card

Twelve Weeks of Christmas Week #6

It’s week six of my new Twelve Weeks of Christmas series! Each week throughout the season I will be posting a new project with full-color instructions for you to download and print for your paper crafting library! And, new this year, I’ll be including a video tutorial to go along with every Twelve Weeks project!

Today’s project is this Sweetest Christmas Candy Cane Shaker Card:

Click on the button below to view the full-color, step-by-step instructions. Feel free to download and print for your personal use.

Video Tutorial

Product List
Sweet Candy Canes Bundle (English)
Real Red Classic Stampin' Pad
Garden Green Classic Stampin' Pad
Basic White 8 1/2" X 11" Thick Cardstock
Real Red 8-1/2" X 11" Cardstock
Sweetest Christmas 12" X 12" (30.5 X 30.5 Cm) Designer Series Paper
Clear Medium Envelopes
Real Red & Garden Green 3/8" (1 Cm) Ribbon Combo Pack
Multipurpose Liquid Glue
Stampin' Seal
Tear & Tape Adhesive
Stampin' Cut & Emboss Machine

Make a Give it a Whirl Spinner Candy Box

The project I’m sharing with you today is this spinner candy box. The box is made using the Give-it-a-Whirl dies from Stampin’ Up! The inspiration for this Give it a Whirl Spinner Candy Box came from Emma Fawcett. Emma is a Stampin’ Up! Demonstrator from the U.K. and goes by Emma’s Crafty Space on YouTube.

The Spinner Candy Box is a fun, interactive way to give some sweet treats. Two Christmas greetings peek out as you turn the spinner on the box top. The third space in the spinner top reveals the opening and all the candies inside!

Below is a cutting and scoring guide to help construct the base for the spinner box. Watch the video tutorial for specific instructions to assemble the spinner portion.

Cutting & Scoring Diagram

Score 10″ x 5-1/2″ piece of Real Red cardstock at 1″, 4-1/2″, 5-1/2″ and 9″ on the 10″ side. Score it at 1″ and 4-1/2″ on the 5-1/2″ side. Trim per red lines on the diagram using paper snips.

Product List

12 Weeks of Christmas Sweetest Christmas Triangle Box

Twelve Weeks of Christmas Week #5

It’s week five of my new Twelve Weeks of Christmas series! Each week throughout the season I will be posting a new project with full-color instructions for you to download and print for your paper crafting library! And, new this year, I’ll be including a video tutorial to go along with every Twelve Weeks project!

Today’s project is this Sweetest Christmas Triangle Box:

Click on the button below to view the full-color, step-by-step instructions. Feel free to download and print for your personal use.

Video Tutorial

Product List

Make a Sweet Gingerbread Christmas Card

I used one of my favorite new Christmas bundles from Stampin’ Up! to create the cards I’m sharing with you today! The Sweet Gingerbread bundle is so much fun to create with. Here are a few projects that I have made using this bundle:

Instead of Designer Series Paper, I used the Rays of Light background stamp on today’s cards. Pink Christmas cards are trending so I created this card using Flirty Flamingo and Polished Pink inks. Don’t you think the Seasonal Adhesive Backed Sequins appear as snow falling?

Here is another sample using more traditional holiday colors. I’m sorry that I could not get the lighting to work when photographing this one. The Real Red Glimmer Trees and stepping stones are not showing off their sparkling selves in this photo.

Product List

12 Weeks of Christmas Santa in the Chimney Treat Holder

Twelve Weeks of Christmas Week #4

It’s week four of my new Twelve Weeks of Christmas series! Each week throughout the season I will be posting a new project with full-color instructions for you to download and print for your paper crafting library! And, new this year, I’ll be including a video tutorial to go along with every Twelve Weeks project!

Today’s project is this Santa in the Chimney Treat Holder:

Click on the button below to view the full-color, step-by-step instructions. Feel free to download and print for your personal use.

Video Tutorial

Product List
Spruced Up Bundle (English)
Brick & Mortar 3D Embossing Folder
Basic Borders Dies
Give It A Whirl Dies
Real Red Classic Stampin' Pad
Garden Green Classic Stampin' Pad
Real Red 8-1/2" X 11" Cardstock
Sweetest Christmas 12" X 12" (30.5 X 30.5 Cm) Designer Series Paper
Basic White 8 1/2" X 11" Cardstock
Basic Black 8-1/2" X 11" Cardstock
Garden Green 8-1/2" X 11" Cardstock
Regals Stampin' Write Markers
Brights Stampin' Write Markers
Tear & Tape Adhesive
Multipurpose Liquid Glue
Stampin' Dimensionals
Stampin' Cut & Emboss Machine

Spruced Up Christmas Card made using the Four Corners Technique

Make four cards at once? Yes, please! Today’s cards are brought to you by the Four Corners Technique. This was my first time using this technique and I will try it again!

Make sure you watch the video replay from today’s Make-it-Monday Facebook Live to learn how fun and easy cards are to make using the Four Corners Technique.

Several comments during the Facebook live were about the colors I used in the cards. My new favorite Christmas color combo is Real Red with Tahitian Tide.

Product List
Spruced Up Bundle (English)
$45.00
Layering Circles Dies
$35.00
Scalloped Contours Dies
$35.00
Real Red Classic Stampin' Pad
$8.00
Shaded Spruce Classic Stampin' Pad
$8.00
Tahitian Tide Classic Stampin' Pad
$8.00
Gray Granite Classic Stampin' Pad
$8.00
Tuxedo Black Memento Ink Pad
$6.00
Real Red 8-1/2" X 11" Cardstock
$9.25
Basic White 8 1/2" X 11" Cardstock
$10.25
Shaded Spruce 8-1/2" X 11" Cardstock
$9.25
Pearlized Enamel Effects Basics
$15.00
Paper Trimmer
$25.00
Stampin' Cut & Emboss Machine
$125.00
Stampin' Seal
$8.00
Stampin' Dimensionals
$4.25

Make a Spruced Up Spinner Card

I’m sharing an interactive card with you today. The Spruced Up Spinner Card was a lot of fun to make!

The ornament die-cut from the Spruced Up Bundle by Stampin’ Up! worked beautifully for the spinner element. I used Evening Evergreen and Real Red inks to stamp the images onto my card. Those colors were pulled from the Painted Christmas Designer Series Paper. A gold foil ornament top and gold embossing on the snowflake added a little sparkle to the card.

I’m enjoying the Spruced Up Bundle and can’t stop myself! Here are a few more examples of projects made with the bundle.

Product List

12 Weeks of Christmas Snowman Magic Side-Step Card

Twelve Weeks of Christmas Week #3

It’s week three of my new Twelve Weeks of Christmas series! Each week throughout the season I will be posting a new project with full-color instructions for you to download and print for your paper crafting library! And, new this year, I’ll be including a video tutorial to go along with every Twelve Weeks project!

Today’s project is this Snowman Magic Side-Step Card:

Click on the button below to view the full-color, step-by-step instructions. Feel free to download and print for your personal use.

Video Tutorial

Product List

Make a Bewitching Trick-or-Treat Halloween Treat Box

I have another Bewitching Halloween Treat Holder project for you today! There are no tricks, only treats, about this 3-D paper crafting design!

The base for the Bewitching Halloween Treat Holder is fairly simple to complete. It uses two 6″ x 4-1/4″ pieces of Basic Black card stock. Here is a cutting and scoring guide for you to use when making your own box. Remember to cut and score two.

Scoring Guide
Cutting Guide

I used the Bewitching and Alphabest Bundles from Stampin’ Up! to embellish the box.

Product List

Make a Spruced-Up Christmas Tree Card

I’ve been noticing a trend of pink Christmas cards and wanted to give them a go today. My Spruced-Up Christmas Tree Card uses a lot of colors. And, because of all that color, I tried to keep the design simple.

What could be more simple than triangles? I used the Stylish Shapes dies from Stampin’ Up! to cut out four stitched squares and then cut them in half. The triangles can now be stacked to create a Christmas tree! You can make two cards using the die-cut squares.

I shared the emboss/resist technique that I used for this card in the video tutorial below. I also showed how to use your dies in alternate ways.

Product List