
There’s just something so satisfying about a card with lots of layers and texture—and this one checks all the boxes! Today’s project is a beautiful, dimensional design that combines an embossed background with softly distressed cardstock edges for that perfectly imperfect, handcrafted feel.
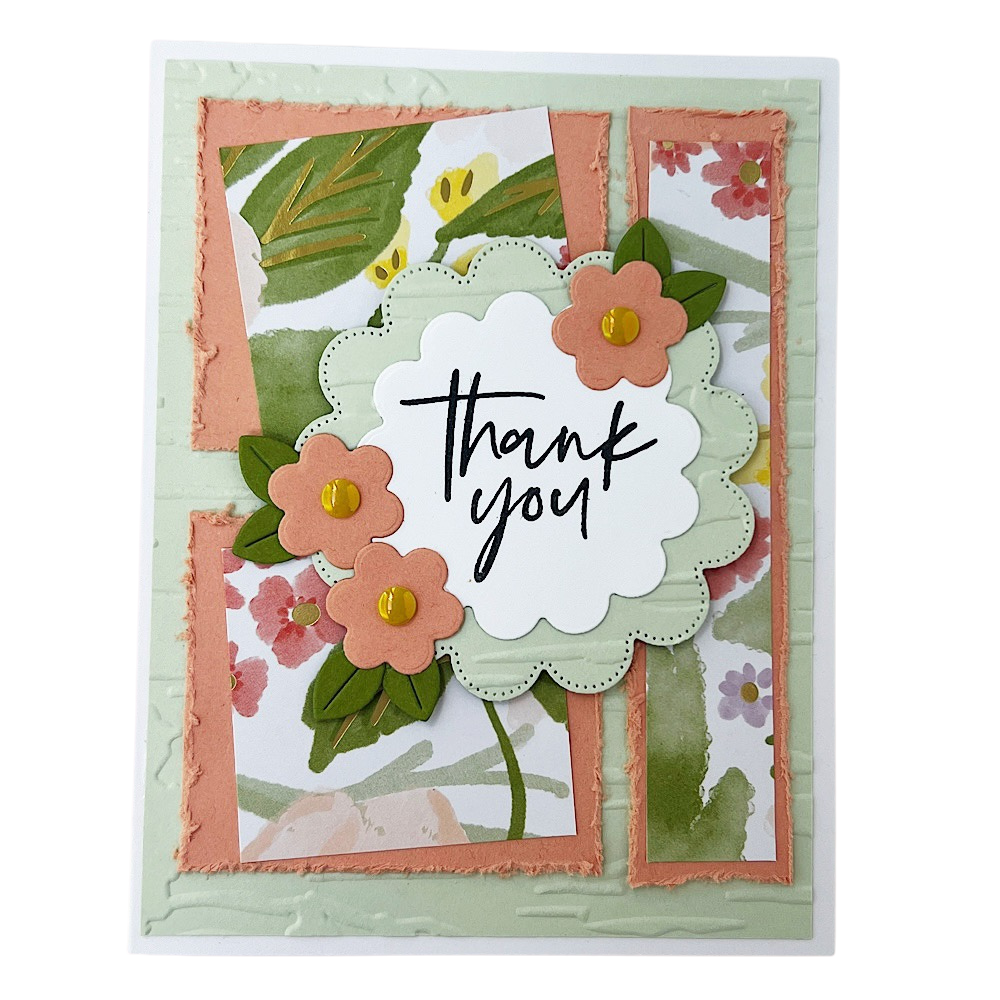
The base of the card is brought to life using an embossing folder, adding subtle texture that peeks through all the layered elements. I love how the torn and distressed edges of the cardstock give it a relaxed, artistic vibe while still feeling polished and put together.
One of the best things about this design is how versatile it is. Once you’ve got the basic layout down, you can recreate it again and again using different papers and embellishments from your stash. Swap out the sentiment, change the color palette, or mix up the layers to suit any occasion—from birthdays to thinking-of-you cards.
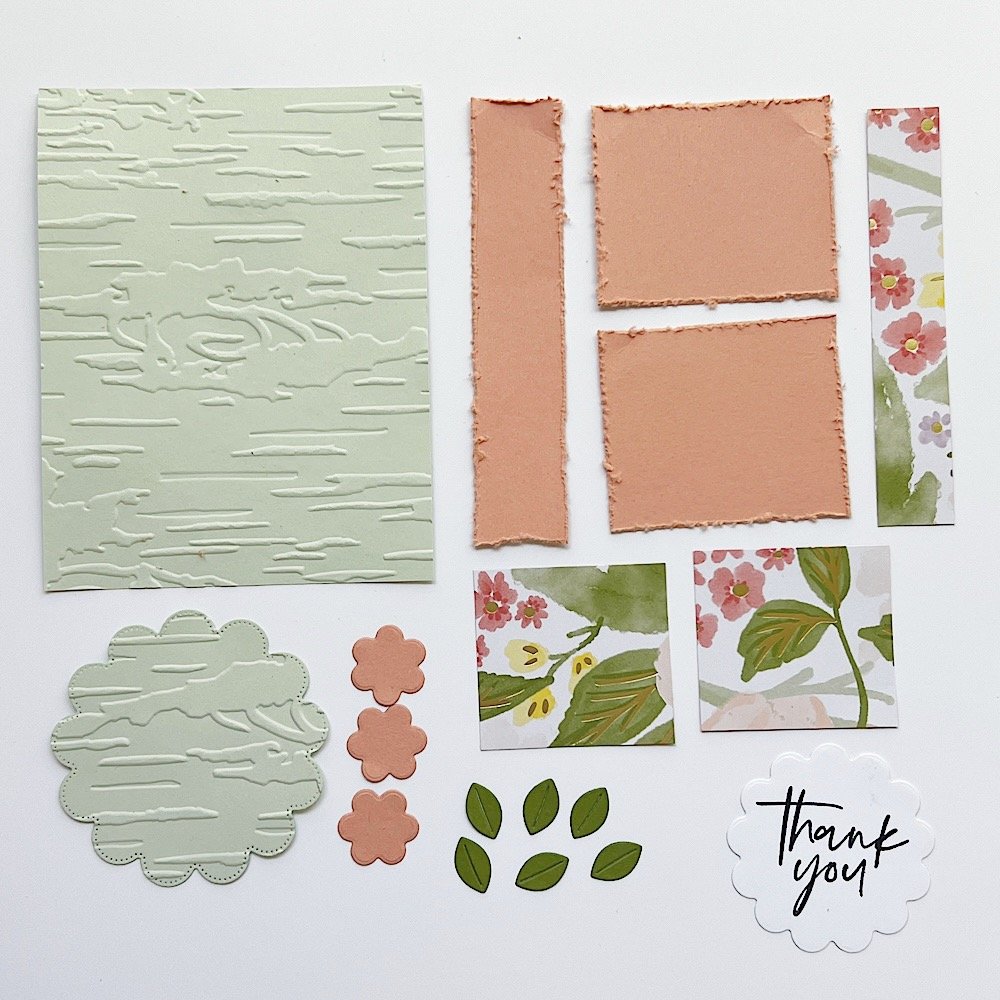
My favorite part of this card has to be the Lovely & Beautiful Specialty Designer Series Paper paired with the mini die-cut flowers. They add just the right touch of sparkle and shine, making the whole design feel extra special without overwhelming it. Here is a photo of all the card parts:
This is definitely one of those go-to layouts you’ll want to keep in your creative rotation. Simple to adapt, fun to build, and full of texture—it’s a win every time! Click on the button below for a free .PDF with all the measurements and step-by-step instructions:
Product List![Fabulous Sayings Photopolymer Stamp Set (English) [ 167972 ]](https://assets1.tamsnetwork.com/images/EC042017NF/167972s.jpg "Fabulous Sayings Photopolymer Stamp Set (English) [ 167972 ]")
![Scalloped Blooms Dies [ 167646 ]](https://assets1.tamsnetwork.com/images/EC042017NF/167646s.jpg "Scalloped Blooms Dies [ 167646 ]")
![Birch Wood 3 D Embossing Folder [ 164069 ]](https://assets1.tamsnetwork.com/images/EC042017NF/164069s.jpg "Birch Wood 3 D Embossing Folder [ 164069 ]")
![Basic Black Hybrid Stampin' Pad [ 166648 ]](https://assets1.tamsnetwork.com/images/EC042017NF/166648s.jpg "Basic Black Hybrid Stampin' Pad [ 166648 ]")
![2025–2027 In Color™ Flat Pearls [ 165192 ]](https://assets1.tamsnetwork.com/images/EC042017NF/165192s.jpg "2025–2027 In Color™ Flat Pearls [ 165192 ]")
![Lovely & Beautiful 12" X 12" (30.5 X 30.5 Cm) Specialty Designer Series Paper [ 166957 ]](https://assets1.tamsnetwork.com/images/EC042017NF/166957s.jpg "Lovely & Beautiful 12\" X 12\" (30.5 X 30.5 Cm) Specialty Designer Series Paper [ 166957 ]")
![Basic White 8 1/2" X 11" Cardstock [ 166780 ]](https://assets1.tamsnetwork.com/images/EC042017NF/166780s.jpg "Basic White 8 1/2\" X 11\" Cardstock [ 166780 ]")
![Soft Sea Foam 8-1/2" X 11" Cardstock [ 146988 ]](https://assets1.tamsnetwork.com/images/EC042017NF/146988s.jpg "Soft Sea Foam 8-1/2\" X 11\" Cardstock [ 146988 ]")
![Crisp Cantaloupe 8 1/2" X 11" Cardstock [ 167693 ]](https://assets1.tamsnetwork.com/images/EC042017NF/167693s.jpg "Crisp Cantaloupe 8 1/2\" X 11\" Cardstock [ 167693 ]")
![Old Olive 8-1/2" X 11" Cardstock [ 100702 ]](https://assets1.tamsnetwork.com/images/EC042017NF/100702s.jpg "Old Olive 8-1/2\" X 11\" Cardstock [ 100702 ]")