Uncategorized

Gleaming Ornaments Punch Pack Christmas Ornament

Today’s project is a 3-dimensional Christmas ornament made using the Gleaming Ornaments Punch Pack from Stampin’ Up! The ornaments are quick and easy to make.

I used the copper foil accented Brightly Gleaming Specialty Designer Series Paper to make my ornament but if you stamp your ornaments using the Christmas Gleaming stamp set you’re free the color of your choice.

The snowflake die-cuts at the center of the ornament were cut using the So Many Snowflakes Dies. The ornaments are really quick and easy to make and would make great package toppers in place of bows.

Product List
Brightly Gleaming Specialty Designer Series Paper
Pretty Peacock 8-1/2" X 11" Cardstock
Gleaming Ornaments Punch Pack
Layering Circles Dies
So Many Snowflakes Dies
Multipurpose Liquid Glue
Stampin' Dimensionals
Mini Stampin' Dimensionals

Cutting Guide

I hope you’re inspired to make your own Gleaming Ornaments Punch Pack Christmas Ornaments. When you purchase the Christmas Gleaming Variety Bundle you receive the Christmas Gleaming Stamp Set, the Gleaming Ornaments Punch Pack and the Brightly Gleaming Specialty Designer Series Paper and save 10%!

12 Days of Christmas!

Hey friends, I’m beyond excited to invite you to join my 12 Days of Christmas subscription event!  

Beginning the week of November 1st, 12 Days of Christmas subscribers will start receiving two emails per week for the six weeks leading up to Christmas. Each email will include an exclusive project designed just for subscribers with a step-by-step tutorial.  

That’s 12 gorgeous holiday projects and it’s all FREE but you must subscribe to begin receiving the tutorials! Click on the button below to subscribe now!

Curvy Christmas Sounds of the Season Christmas Card

That’s a big title but I think today’s “wow” project deserves a big name – lol! I’m giving you a sneak peek of the coming soon Curvy Christmas stamp set, the Curvy Dies and the Classic Christmas 6″ x 6″ Designer Series Paper from Stampin’ Up! used to make this card. The stamp set, paper and the Quite Curvy Bundle will be available for purchase on November 3rd so stay tuned for more information.

The pretty paper pieced bell was cut using the Sounds of The Season dies from the Stampin’ Up! Holiday Mini Catalog. I was on the fence about getting the Cherish the Season Bundle the dies are included in but I’m so happy I did! Here is another card made using the bundle:

Isn’t it beautiful?! The card I made today during my Coffee & a Card Facebook Live is a fun fold and I demonstrate how to cut and score the card on this video replay:

Here is a diagram for cutting and scoring the card base:

Product List
Soft Suede Classic Stampin' Pad
Soft Suede Classic Stampin’ Pad

I hope you enjoyed today’s project and that it may have inspired you to make your own fancy fold card!

Christmas Gleaming Card

We made this farmhouse chic style Christmas Gleaming card during this week’s Coffee & a Card Facebook Live.

Using just a few elements this card was a snap to put together. Punches always speed up the process and the patchwork ornaments on this card were punched out using the Gleaming Ornaments Punch Pack. The technique I used for the ornaments is a great way to use up all the little leftover scraps you may have. Watch the video replay to see how I accomplished the patchwork look on the ornaments.

Paper Dimensions

  • Card Base = 4-1/4″ x 11″ piece of Real Red Cardstock scored at 5-1/2″
  • Heartwarming Hugs Designer Series Paper = 4″ x 3-3/4″
  • Ornament Punches = scraps of Heartwarming Hugs Designer Series Paper
  • Pear Pizzazz Cardstock = 2-4/14″ x 4″
  • Whisper White = 4″ x 5-1/4″ (card insert), 1/2″ x 2-1/4″ (sentiment tag)
Product List

I hope you enjoyed the Christmas Gleaming Card and the patchwork technique. The technique would be easy to use on many types of cards using either punches or dies. I hope today’s project gives you the urge to create your own patchwork cards!

Make an Interactive Christmas Card!

Today’s project is an interactive Christmas card. I’m calling it a swinging tent card. Watch this 7 second video to view the fun swinging motion of the card.

Isn’t that fun?! I recently obtained he Cherish the Season Bundle from Stampin’ Up! and knew the bells would work great for my interactive Christmas card.

This card would be fun to send and awesome to receive. There is a small mechanism made with card stock that enables the swinging motion. Watch the video below for a step-by-step tutorial.

Cutting/Scoring Guide

  • Card Base = 11″ x 4-1/4″ piece of Cherry Cobbler scored at 5-1/2″
  • ‘Tis the Season Designer Series Paper = two pieces 4″ x 5-1/4″
  • Swing Mechanism = 1-1/2″ x 1/2″ piece of Cherry Cobbler scored at 1/4″, 3/4″ & 1-1/4″ on the 1-1/2″ side
  • Tent = 4-1/4″ x 2-1/2″ piece of Cherry Cobber scored at 1/2″, 1-1/4″ & 2″ on the 2-1/2″ side
  • Window Sheet = 3/8″ x 3″
  • Sentiment Tag = 1″ x 3-3/4″ piece of Cherry Cobbler and 3/4″ x 3-1/2″ piece of Whisper White
  • Stamped Images = 3″ x 2″ piece of Whisper White card stock
  • Scallop Circle = 3-1/2″ x 3-1/2″ piece of Cherry Cobbler
Product List

Celebrations Tidings Home Decor Project

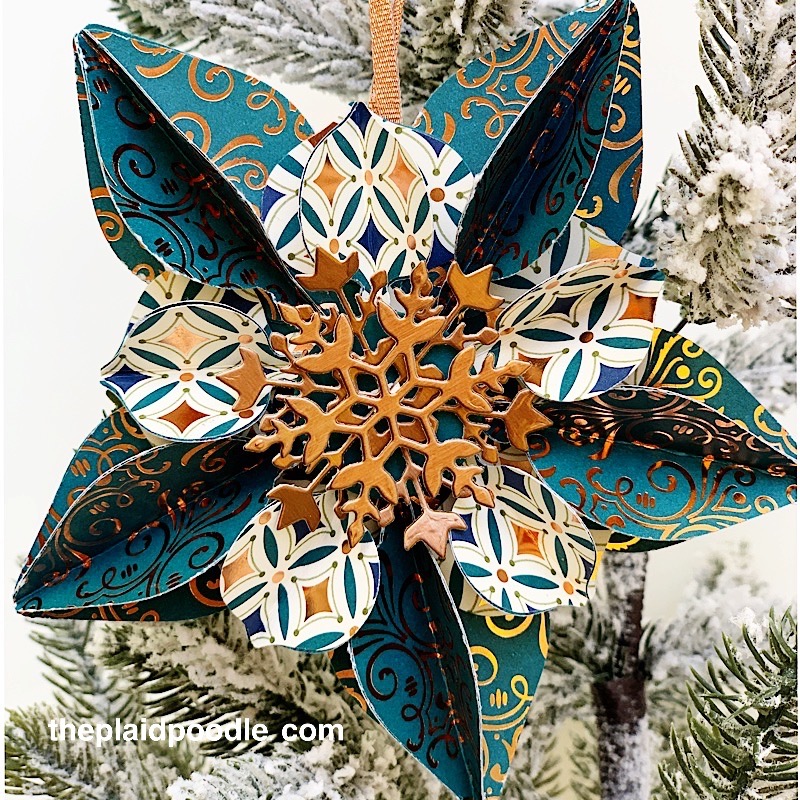
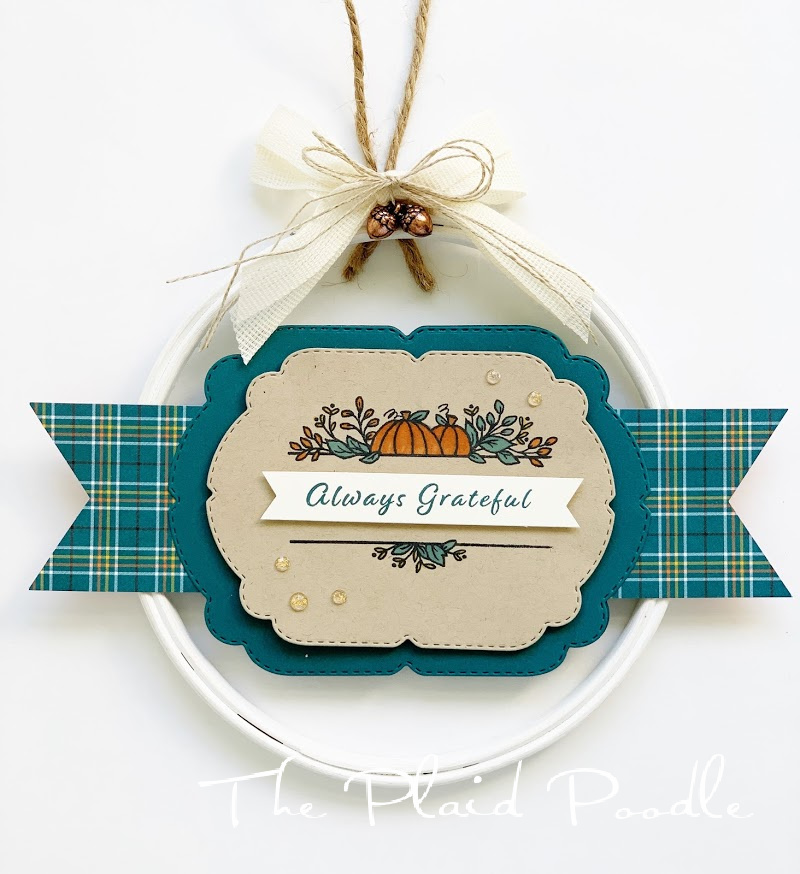
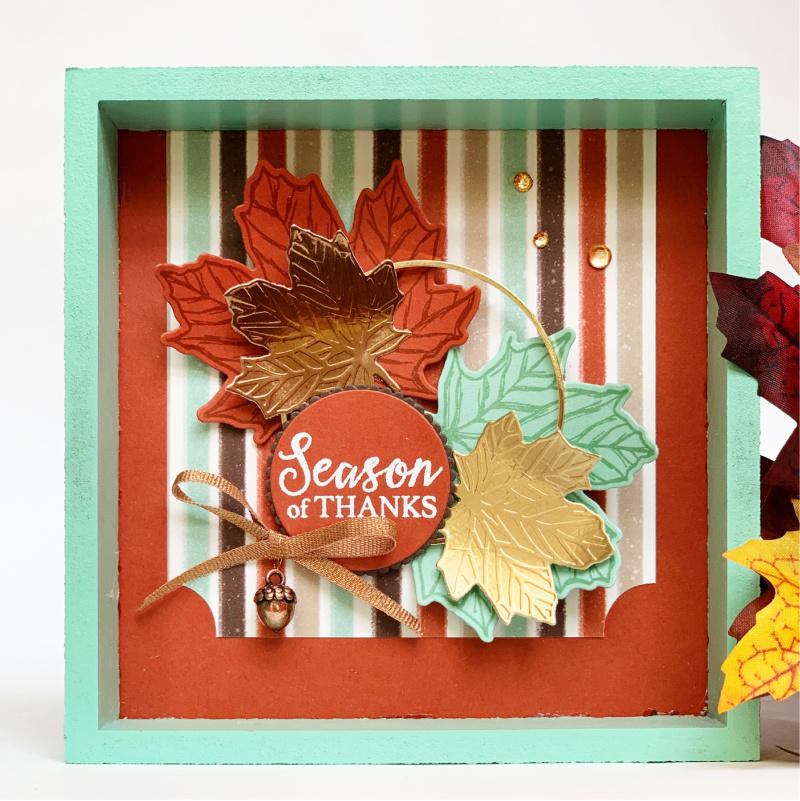
The inspiration for today’s Celebration Tidings Home Decor project came from Yvonne Spikmans of The Creative Teacup. Once I saw Yvonne’s embroidery hoop home decor project I knew I wanted to make one for myself.

To make my version I painted a 6″ embroidery hoop with white craft paint and cut the following papers:

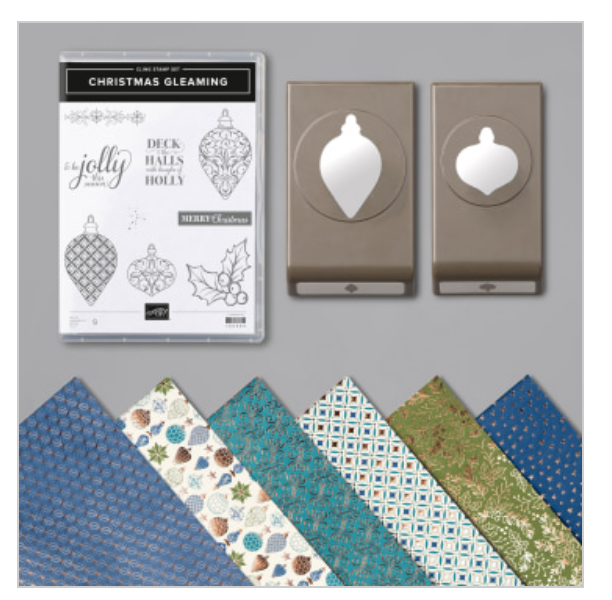
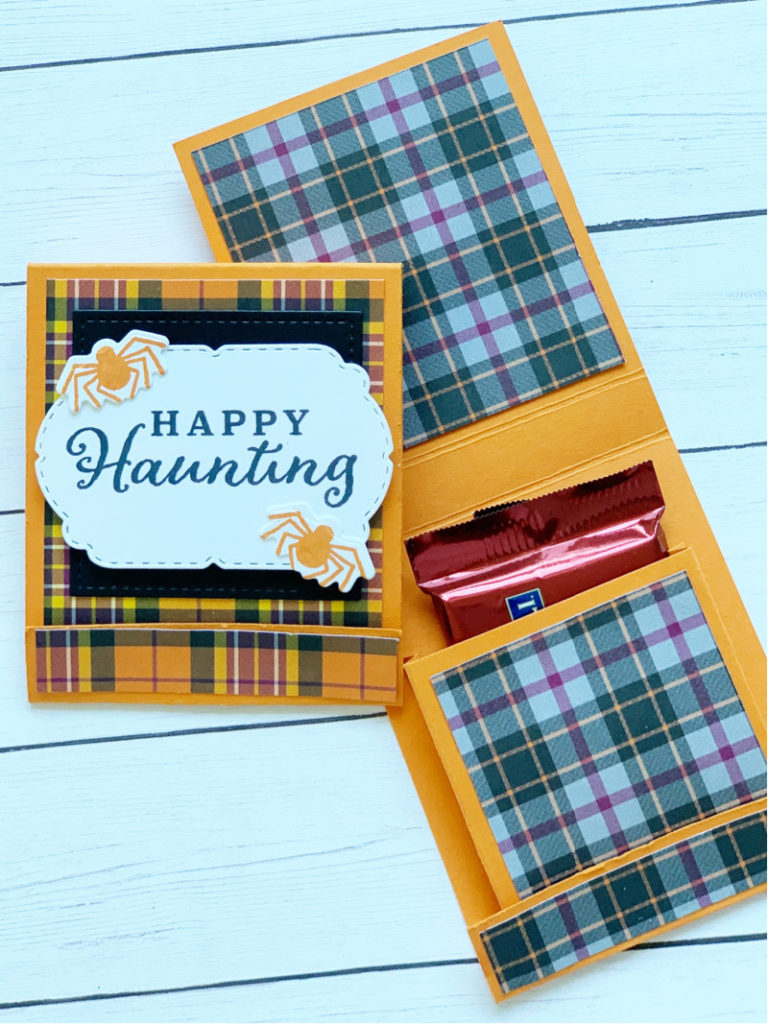
  • Plaid Tidings 6″ x 6″ Designer Series Paper = 2″ x 6″
  • Pretty Peacock Cardstock = 1-7/8″ x 6-1/2″, two pieces 5″ x 5″ each
  • Crumb Cake Cardstock = 5″ x 4″
  • Very Vanilla Cardstock = 3/8″ x 3-1/2″

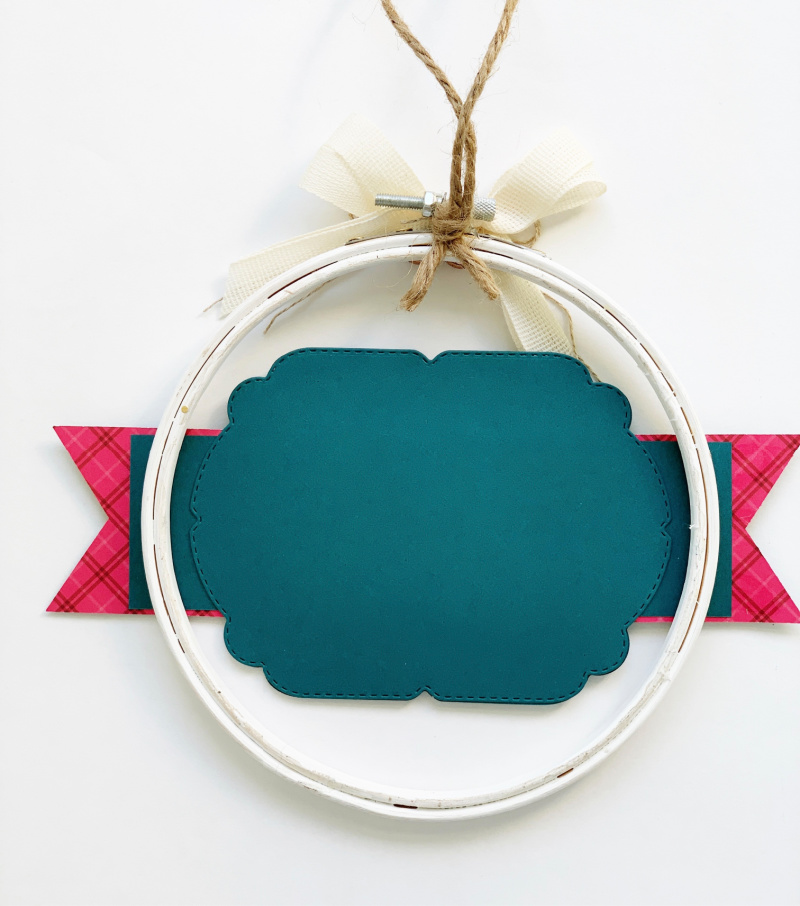
I adhered the 1-7/8″ x 6-1/2″ strip of Pretty Peacock Designer Series Paper to the hoop using MultiPurpose Liquid Glue. Next, I cut the 2″ x 6″ piece of Plaid Tidings Designer Series Paper in half and punched one end of each 3″ x 2″ piece using the Triple Banner Punch. The flagged Designer Series Paper was then adhered to each end of the strip of Pretty Peacock cardstock on the hoop.

I cut a label from from each 5″ x 5″ piece of Pretty Peacock cardstock with the second largest die from the Celebration Labels Dies using my die-cutting machine. I adhered one die-cut to the cardstock on the front of the hoop using Multi-Purpose Liquid Glue.

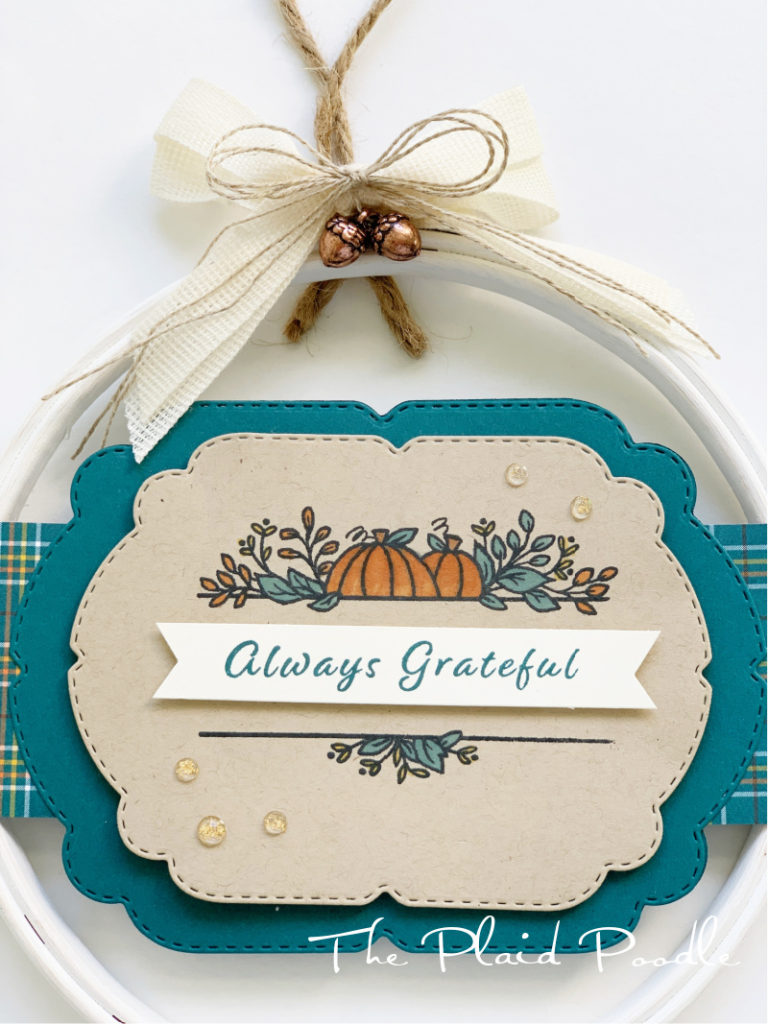
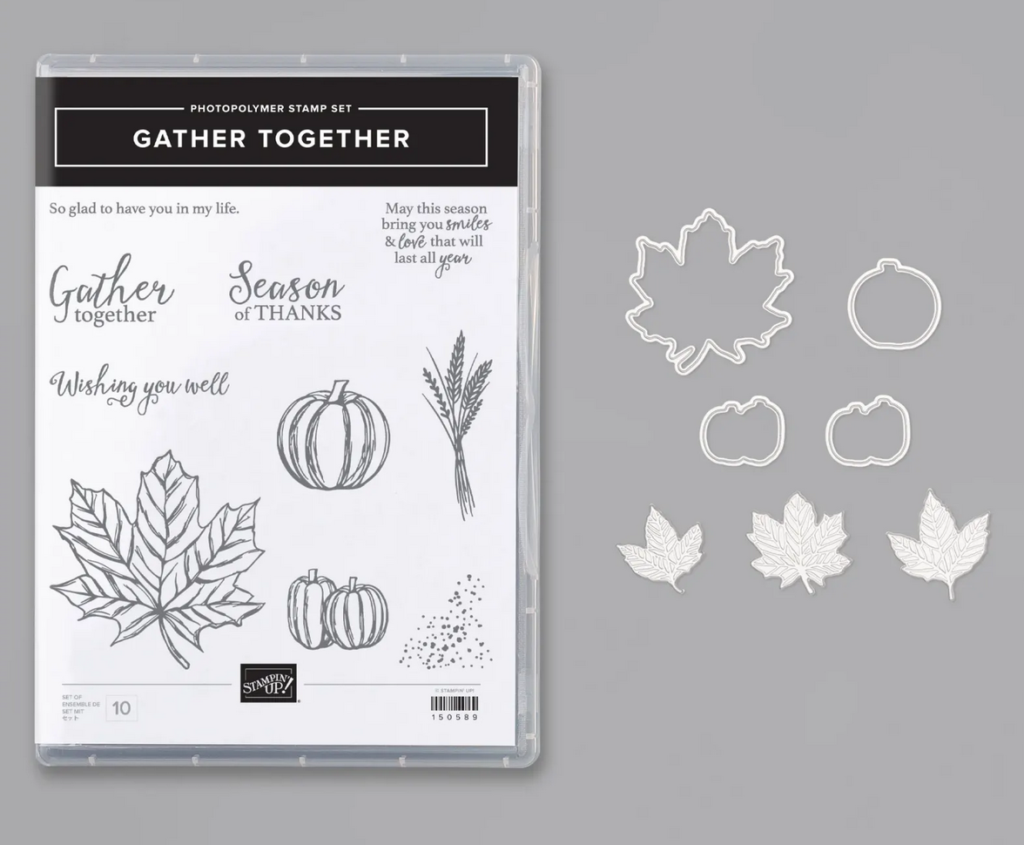
Next I cut a label from the 5″ x 4″ piece of Crumb Cake cardstock with the third largest die from the Celebration Labels Dies. I stamped images from the Celebration Tidings Stamp Set onto the die-cut using Memento Ink and colored the images using Stampin’ Blends. I adhered this label to the Pretty Peacock label on the hoop using Stampin’ Dimensionals.

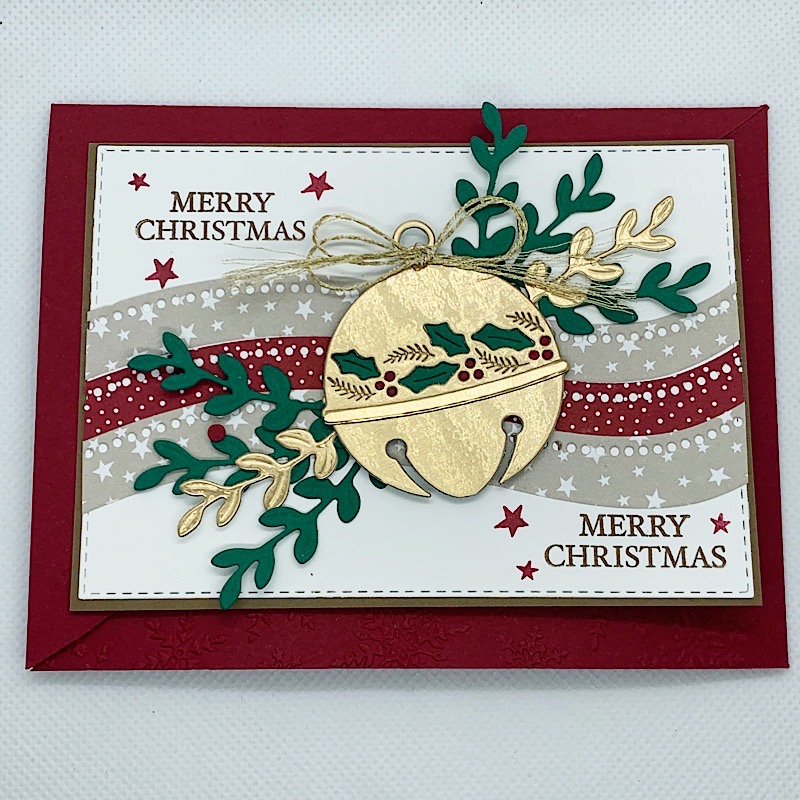
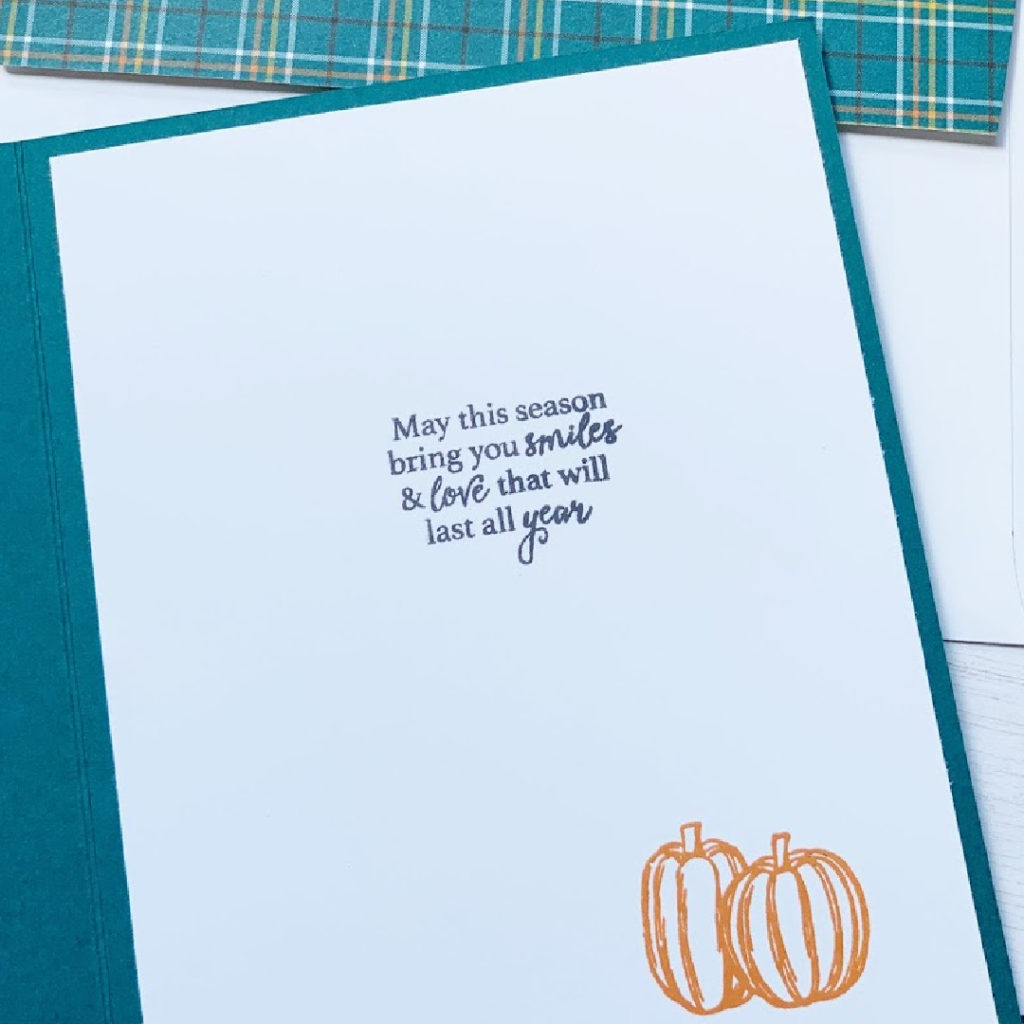
To complete the front of the project I stamped the sentiment onto a 3/8″ x 3-1/2″ piece of Very Vanilla cardstock with Pretty Peacock ink, punched each end of the tag using the Triple Banner Punch, then adhered the tag to the project using Stampin’ Dimensionals.

The project needed a little fancy so I added five Wonderful Gems, a bow made with trim from the Forever Greenery Trim Combo, a Linen Thread double bow and two Acorn Trinkets.

Finally I adhered the second Pretty Peacock die-cut label to the back of the front label on the hoop to cover up the situation on the back of the project and added a hanger with a length of jute twine.

Product List

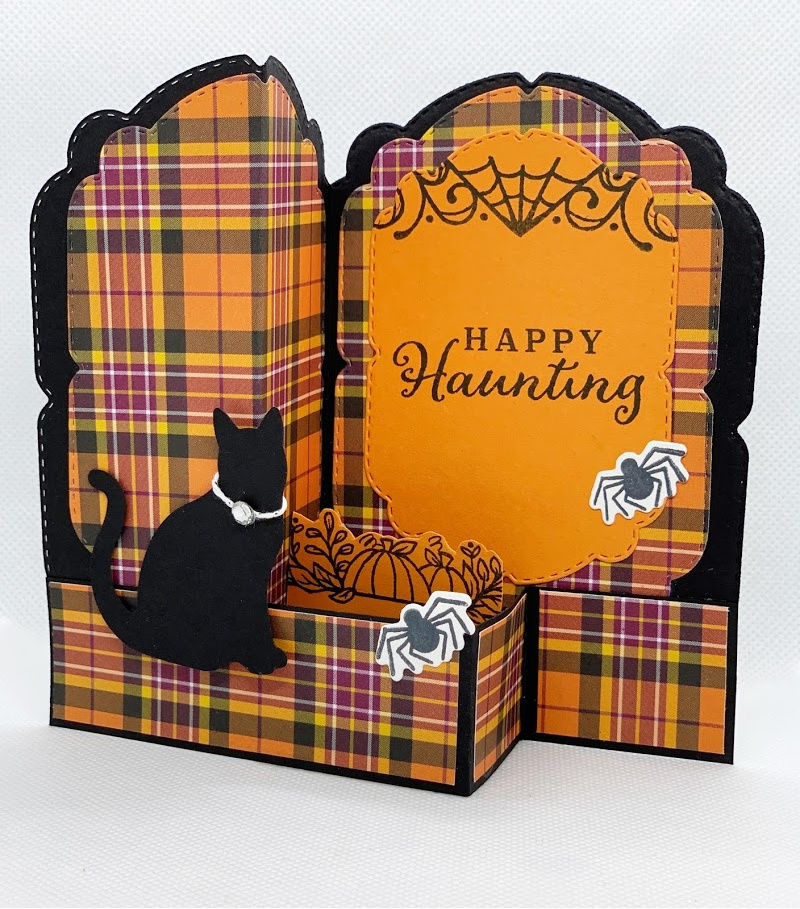
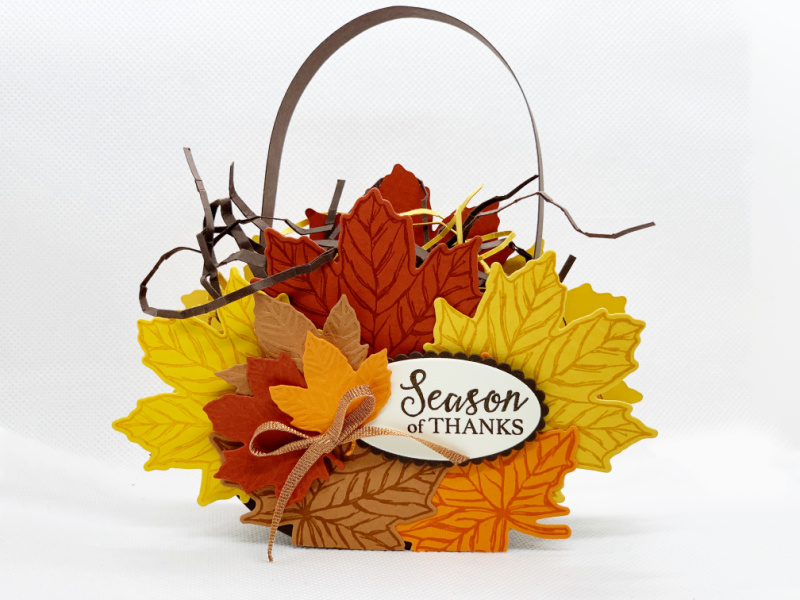
This sweet little Celebration Tidings Home Decor project would look lovely in your home this autumn season. They would also make the nicest hostess or “thinking of you” gifts.

Halloween Matchbook Treat Holder with Pocket

When I need a quick party favor or small “thinking about you” gift I often turn to the easy breezy matchbook treat holder. Today’s Halloween Matchbook Treat Holder has an inside pocket.

The pocket inside the matchbook is the perfect size for a Ghirardelli Chocolate. I made a version of this Matchbook Treat Holder for my August customer thank-you gifts and tucked a couple trinkets inside. It’s also a great place to tuck a folded $20 bill into for your dog groomer which I plan on doing today!

Cutting & Scoring Guide

  • Matchbook = 7-3/8″ x 2-3/4″ piece of Pumpkin Pie card stock. Score at 3″, 3-1/2″ and 6-3/4″ on the 7-3/8″ side.
  • Inside Pocket = 5-3/4″ x 2-3/8″ piece of Pumpkin Pie card stock. Score at 2-1/4″, 2-1/2″, 2-3/4″, 5″, 5-1/4″ and 5-1/2″ on the 5-3/4″ side
  • Plaid Tidings Designer Series Paper = 2-1/2″ x 2-3/4″ (matchbook cover), 1/2″ x 2-5/8″ (matchbook tab), 2″ x 2″ (pocket front), optional 2-1/2″ x 2-3/4″ for inside matchbook cover
  • Whisper White = 2-1/4″ x 3″ (tag), scrap (spiders)
Product List

I hope that I have inspired you to create your own Halloween Matchbook Treat Holder with Pocket for all the little boys and ghouls you know! Please let me know if you have any questions or if I can help you with any of your paper crafting needs.

Snowman Season Fun Fold Card

Everybody loves a great fun fold card and the card I’m sharing today is super fun and super easy to make! It’s called a w-fold card. The w-fold creates a sweet little pop-up action when you open the card.

It’s a winter themed card that I plan to use for a swap I’m participating in. I used the Snowman Season stamp set along with the Snowman Builder Punch to to create the card.

No special tools are required to make this fun fold card. If you own a Paper Trimmer you can make a w-fold card. Here is the replay of this week’s Coffee & a Card Facebook Live where I demonstrate how to make this card. If you forward to 4:28 on the video you can skip all the chit chat and get right to the project!

Project Cutting/Scoring Guide

  • Card Base = 4-1/4″ x 11″ piece of Real Red Cardstock scored at 5-1/2″ on the 11″ side then folded in half.
  • Real Red = 2″ x 11″ scored at 2-3/4″, 5-1/2″ & 8-1/4″ on the 11″ side, 3-3/4″ x 2-1/4″ (label)
  • Pear Pizzazz = 4″ x 5-1/4″, four panels 2-7/8″ x 2-1/8″ each, 2-1/2″ x 4-1/4″ (label die-cut)
  • Heartwarming Hugs Designer Series Paper = 3-3/4″ x 5″, 4″ x 5-1/4″
  • Whisper White = 4″ x 5-1/4″, four panels 2-3/4″ x 2″ each, 3-3/4″ x 2-1/4″ (snowman punch), scrap (tag)
Product List

Thanks for stopping by. I hope this post inspires you to create your own w-fold card. Make sure to subscribe to my YouTube channel so that you don’t miss any future paper crafting projects!

Poinsettia Place Card Class to Go

I’m excited to announce the Poinsettia Place Card Class to Go! This class is a little new and different in that it is not product based. Although after you see the cards included in the kit, I know you are going to want the Poinsettia Place Bundle from Stampin’ Up, it is not required to complete the cards in this kit.

Poinsettia Petals Card Class to Go

$25 includes shipping ($22 for local porch pickup)

  • Access to exclusive online class. The Online Classroom Includes full color photos, measurements, written instructions, supply lists and a step-by-step video tutorial.
  • 6 card bases & envelopes
  • pre-cut card mats
  • pre-cut Designer Series Paper, embossed layers and silver foil
  • 10 labels
  • 43 die-cuts
  • 2 beaded pearl embellishments

Items not included in the card kit are adhesive and the stamped greetings. You will need your favorite adhesive and your own greeting stamps to stamp onto the 10 pre-cut labels included in the kit. (I used sentiments from the Poinsettia Petals stamp set with Early Espresso Ink and VersaMark Ink & Silver Stampin Emboss Powder on my samples.)

The cost of the kit is $25.00 and includes postage to anywhere in the USA.

Registration for this class will close Sunday, September 27, 2020. I anticipate the first orders will be mailed beginning September 28, 2020.
 
To order your Poinsettia Petals Card Class to Go, please click the “Buy Now” button.

Here is a complete list of products I used to create the Poinsettia Place Card Class to Go. Click on any of the images to place an online order.

Product List

Halloween Z-Fold Card

I haven’t made many Halloween cards this year so I put my thinking cap on and came up with this Halloween z-fold card made using the Celebration Tidings Bundle from Stampin’ Up!

The card base for this Halloween z-fold card is shaped using the Celebration Labels Dies from Stampin’ Up! I thought it made the card have a headstone shape. Super spooky for Halloween! Watch this video tutorial to see how I cut the card base out.

The colors in the Plaid Tidings Designer Series Paper were made for Halloween projects so I grabbed them for my cards. I made one card with the Smokey Slate background print and one with the Pumpkin Pie background print.

There is an extra tab in the center of the z-fold card to adhere an additional image onto. I stamped the pumpkin patch image from the Celebration Tidings stamp set onto Pumpkin Pie cardstock with Memento Tuxedo Black ink then trimmed and fussy cut it out. It appears my ritzy kitty is sitting in the middle of a pumpkin patch.

Paper Cutting/Scoring Guide & Supply List

  • Card Base = 8-1/2″ x 5-1/2″ piece of Basic Black card stock scored at 4-1/4″ on the 8-1/2″ side
  • Bridge = 7″ x 1-1/4″ piece of Basic Black card stock scored at 3-5/8″ x 5-3/16″ on the 7″ side.
  • Tab Insert = 1″ x 2-3/4″ piece of Basic Black card stock scored at 1/2″ and 2-1/4″
  • Plaid Tidings Designer Series Paper = two pieces 5″ x 3-1/2″ each, 1-1/8″ x 3-1/2″, 1-1/8″ x 1-3/8″, 1-1/8″ x 1-1/2″
  • Cat = scrap of Basic Black card stock
  • Spiders = scrap of Whisper White card stock
Product List
Silver Baker's Twine
Silver Baker’s Twine

Thanks for stopping by my little corner of the web. Hopefully my Halloween Z-fold card has inspired you to make one of your own. Please contact me if I can answer any questions or assist you with your paper crafting needs.

DIY Dollar Tree Autumn Home Decor

I’m so excited to share with you today’s DIY Dollar Tree autumn home decor project! It’s super easy to make and will look great tucked on a table somewhere in my home this Fall season.

The frame was purchased from Dollar Tree. It looked like this before my enhancements.

Cute if you’re my 5-year old granddaughter but I had something else in mind. To begin with I removed the backing of the frame and peeled off the unicorn paper. The little foam flowers were salvageable and will be put away for a future project.

I thought I would probably need to repaint the frame but the color coordinated perfectly with the Mint Macaron from the Gilded Autumn Specialty Designer Series Paper from Stampin’ Up!

How many times have you seen or made a card and thought, “That’s pretty enough to frame”? That’s exactly what I did with today’s project. I hope I inspired you to make your own DIY Dollar Tree autumn home decor project!

HAPPENING NOW!

Stampin’ Cut & Emboss

Clearance Rack Refresh

  • The Clearance Rack has been refreshed. Items are “while supplies last”.

Get and Go Starter Kit Promotion

Now’s the perfect time to join Stampin’ Up! and become a member of our team!

In addition to the regular starter kit (for $99) you can choose $125 -worth of products.  You will also receive:

  • Card stock to make 16 cards
  • Package of Rhinestone Basic Jewels
  • So Much Love Stamp Set
  • Queen Anne’s Lace Stamp Set

If you have any questions about joining please let me know! Hobby demos and business builders are welcome!! You can find more information by clicking here.

September Host Code

Gather Together Autumn Treat Holder

Today’s project, the Gather Together Autumn Treat Holder, is a WOW project and I am so excited to share it with you!!!

Can you imagine setting one of these at each place setting this Thanksgiving? I can and that’s exactly what I’m going to do! These sweet little treat holders would also make great hostess or teacher gifts. To make the Gather Together Autumn Treat Holder I used the Gather Together bundle from Stampin’ Up!

Cutting & Scoring Guide

  • Early Espresso Cardstock = 7″ x 4″ (oval die-cuts), 6-1/2″ x 2″ (basket), 1-1/2″ x 2-1/2″ (sentiment tag)
  • Cajun Craze, Bumblebee, Crushed Curry, Pumpkin Pie & Cinnamon Cider cardstock = 5-1/2″ x 2-3/4″ (stamped leaves), scraps (embossed leaves)
  • Very Vanilla = 1-1/2″ x 2-1/2″
Product List

I hope you enjoyed the Gather Together Autumn Treat Holder and that it inspired you to make one yourself. Please reach out to me if I can help you with any of your paper crafting needs.

Gather Together Die-Cut Card

The autumn season is fast approaching and I’ve been playing around with some of the stamp bundles from the Holiday Mini catalog from Stampin’ Up! Nothing says autumn like falling leaves and pumpkins! Today’s project has both!

I used the Gather Together Bundle to make this Gather Together die-cut card. Leaves and pumpkins never go out of style so this bundle will be used years from now.

The inside verse on my card is so sweet.

Watch the replay of my Coffee & a Card Facebook Live to see how easy this Gather Together die-cut card is to make.

Paper Cutting Guide:

  • Card Base = 8-1/2″ x 5-1/2″ piece of pretty Peacock cardstock scored at 4-1/4″
  • Plaid Tidings Designer Series Paper = 5-3/8″ x 4-1/8″
  • Crumb Cake cardstock = 5-1/4″ x 4″
  • Whisper White = 3″ x 2″ and 5-1/4″ x 4″
Product List
Pumpkin Pie Classic Stampin' Pad
Pumpkin Pie Classic Stampin’ Pad

Make a Tri-Fold Slimline Card

Today’s card was so much fun to make! It’s a tri-fold slimline card with a surprise on each layer. The card front has a large framed window peeking at a charming outdoor scene. The second layer of the card has a sweet little snow-covered tree.

And the final layer, the inside of the card, shows the rascally raccoon getting ready to take his sled down the snowy slope!

Project Recipe

  • Card Base = 10-7/8″ x 5-1/2″ piece of Crumb Cake card stock scored at 3-5/8″ and 7-1/4″ on the 10-7/8″ side.
  • Heartwarming Hugs Designer Series Paper = 6-1/4″ x 3-1/2″ (window frames)
  • Whisper White = 3-1/2″ x 2-1/2″ (snow bank) and 4″ x 2-3/4″ (stamped images)

The tri-fold slimline card is designed to fit into a regular A2 card-sized envelope. Watch the video replay of today’s Make-it-Monday Facebook Live to learn how to make your own tri-fold slimline card.

Product List