Cards

Creative Ideas to Transform Your Welcome Inn Paper Pumpkin Kit

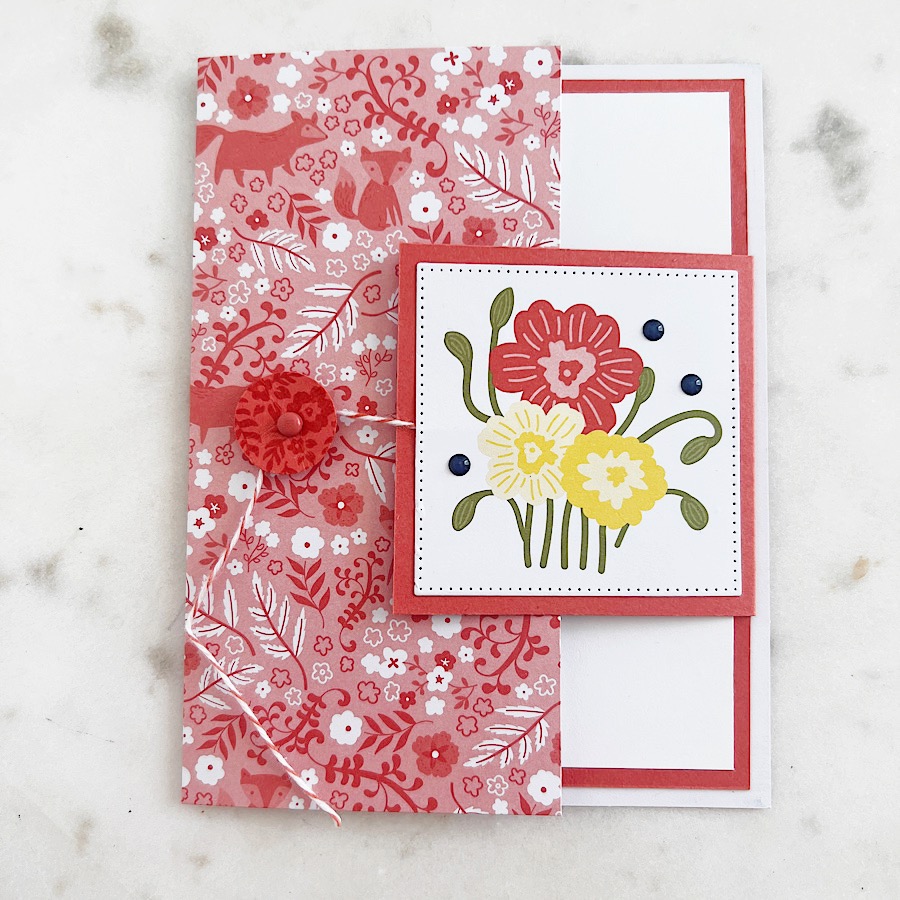
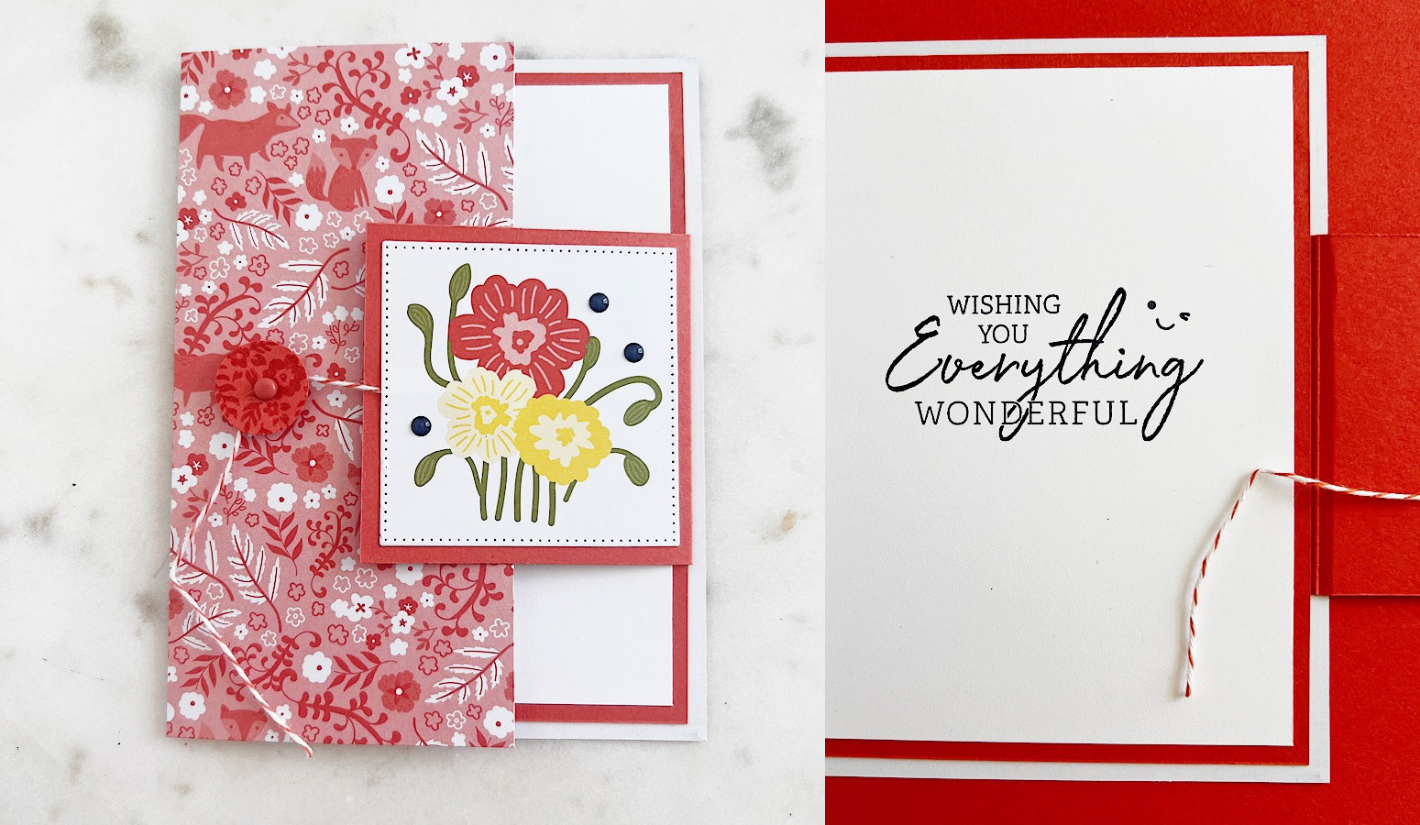
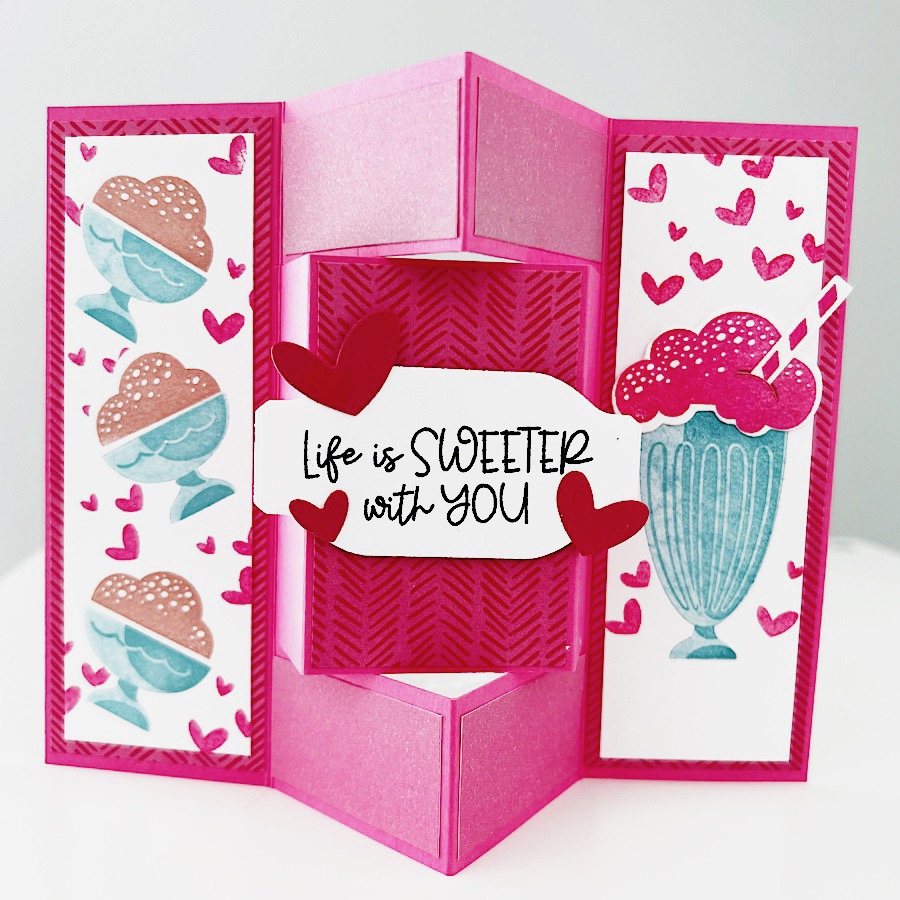
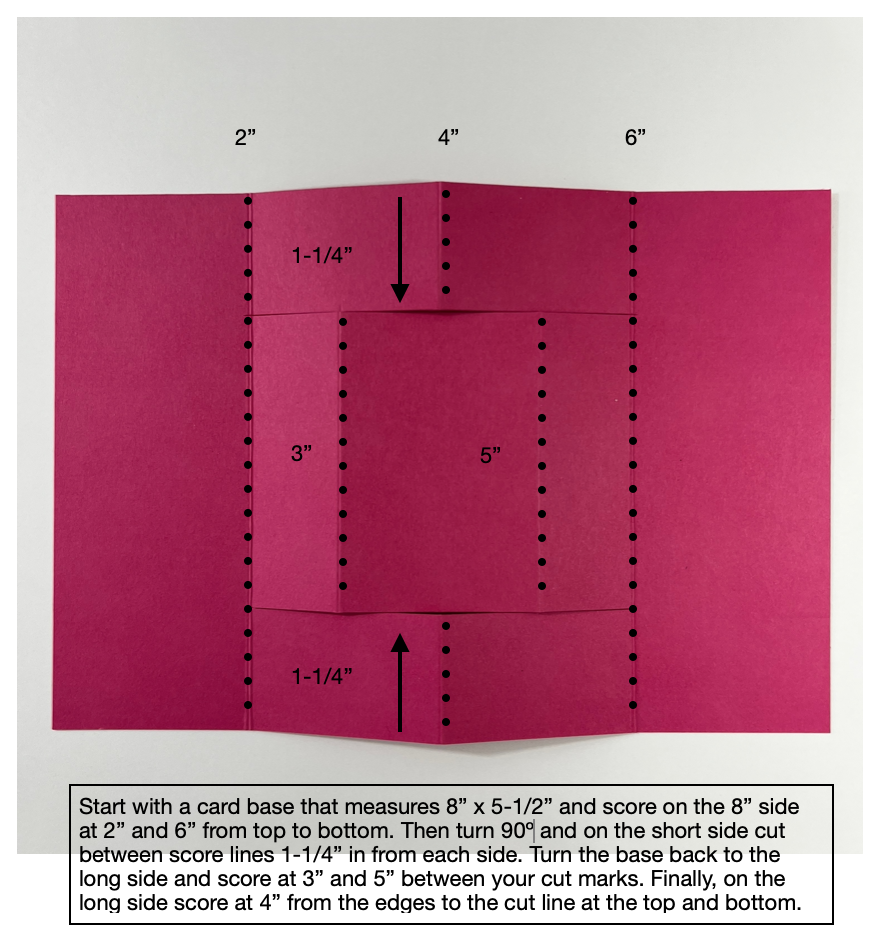
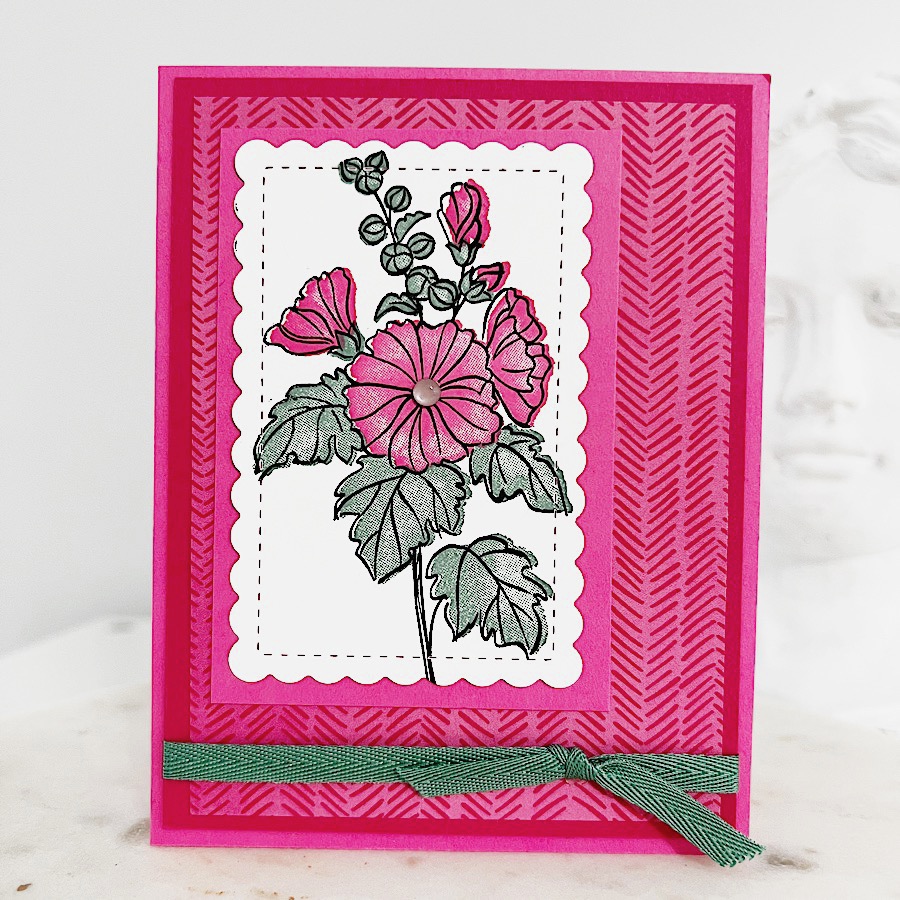
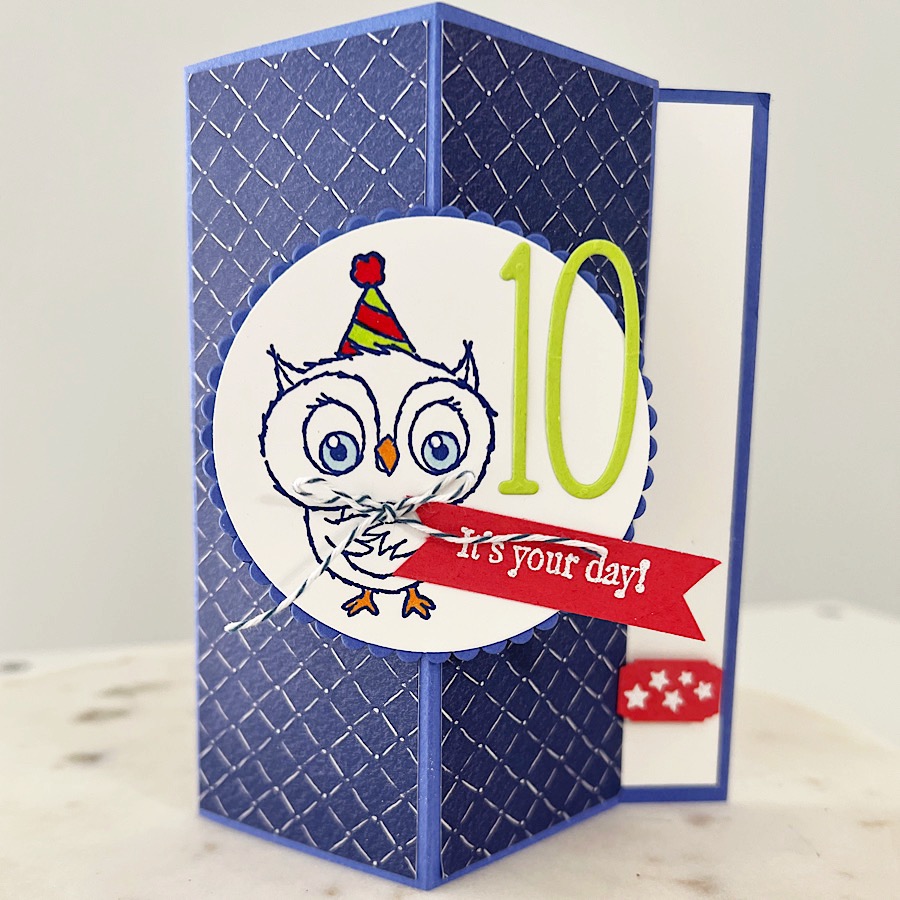
Here’s an alternative project I made using the June 2023 Welcome Inn Paper Pumpkin Kit. It’s a fun-fold card using elements from the kit. I loved the printed card bases in this kit! To find out more about Paper Pumpkin and how to obtain a kit click here.

I used parameters from last week’s #craftroulettechallenge to create the card. Are you familiar with Craft Roulette? It’s a weekly live show featuring improvised crafting, special guests, community contributions, tons of prizes, and much, much more! The Craft Roulette wheel decides what the project will be and what elements to use. The parameters for this card were:

  • Project = 2 Folds
  • Colors = Planter
  • Element = Happy Face
  • Random = An Old Product

I think I nailed it with my 2-fold fun-fold card, Calypso Coral color, old brad and baker’s twine and the happy face I stamped with the sentiment inside the card.

I’ll be a guest crafter on Craft Roulette this Friday, July 14, and would love for you to join us. Cheer me on and create your own project! Find out all about it by clicking on this link then plan to watch it Friday at 6:30 pm CT: https://craftroulette.live/

Video Tutorial

Free Card Kit with Purchase!

During the month of June, when you place an order of $40 or more with me using Host Code M9CNUXG7, you will receive a free card kit! The card kit will include everything you need to complete three, beautiful multi-layer cards except adhesive, ink, and stamped sentiments.

Your free card kit will include:

  • An email with full-color card instructions
  • Three card bases, one embossed
  • Precut cardstock layers
  • Precut Countryside Inn Designer Series Paper
  • Cheerful Daisies die-cuts
  • Ribbon embellishment
  • Blank sentiment tags

To get your free card kit, place your order of $40 or more (before tax and shipping) by clicking on the button below:

Simple Steps to Make a Cheerful Daisies Polaroid-Style Greeting Card!

A Polaroid-style card is a great option when I want to show off a beautiful designer series paper. The Polaroid frame is easy to cut when you use a stitched square die from the Stylish Shapes Dies from Stampin’ Up! The “frame” I cut for today’s project measures 3-1/2″ x 3-1/4″.

Product List

Everything You Need to Know About Making a DIY Matchbook Card

I’m using the parameters given in Episode 162 of Craft Roulette to create my project today. What is Craft Roulette? It is a live papercraft challenge show where the goal is to create a project that has been randomly selected by the spin of a wheel. You can catch live episodes every Friday night at 6:30 CT here: https://www.youtube.com/@CraftRoulette

Can you guess what the parameters from the show were by looking at my finished card?

If you guessed matchbook card, flowering field colors, a bird element, and a random wood grain you would be correct!

Cutting & Scoring Guide

  • Card Base = 11″ x 4-1/4″ Basic White cardstock scored at 4-3/4″ and 10″ on the 11″ side
  • Basic Black Cardstock = 4″ x 4″ and 4-1/8″ x 7/8″
  • Real Red Cardstock = 4″ x 3/4″ and 3-1/2″ x 1-1/4″
  • Designer Series Paper = 1-3/4″ x 3-1/2″
  • Crushed Curry Cardstock = 2-1/2″ x 1-1/2″
  • Basic White = 3-7/8″ x 1/2″ (sentiment tag), 3″ x 3″ (circle die-cut), and scraps for stamped images

I demonstrated my process for making this card on today’s Coffee & a Card Livestream. I mentioned in the video that I would probably add some flowers to better meet the Craft Roulette parameters and that is what I did using a stamp and die from the Playing in the Rain stamp set and dies.

Product List

Learn Some Helpful Tips & Tricks for Making a Lattice Card

I ‘ve been seeing handmade lattice cards all over the internet and until now have been hesitant to give it a try. During a recent get together with some crafty card friends, one of them shared with me how to easily make a lattice card.

To keep the lattice on the card straight and square we used the grid paper from Stampin’ Up! and a hand-crafted “spacer”. Watch the replay of my Coffee & a Card Livestream for step-by-step directions.

Cutting/Scoring Guide

  • Card Base = 11″ x 4-1/4″ piece of Thick Basic White cardstock scored at 5-1/2″. Fold on the score line then cut 3″ off the front flap of the card front.
  • Lattice = two 1/2″ x 5″ pieces of Thick Basic White cardstock, four 1/2″ x 4-1/4″ pieces of Thick Basic White cardstock.
Product List

Get Ready for the ’23-‘Stampin’ Up! Annual Catalog: Sneak Peek of the Best Samples

The day we’ve been waiting for is finally here. The Stampin’ Up! ‘23-‘24 is live today! Sales from the new catalog begin today!

The Fresh as a Daisy Suite from the new catalog is one of my favorites. I cased this card from New Zealand demonstrator Jan Clotheir using products from the suite.

I shared several project samples using products from the new catalog in today’s Livestream. Watch the replay here:

The online version of the catalog can be seen here on my Catalog Page Here.

SHOP ONLINE 24/7 HERE – https://bit.ly/3noFXQs

HOST CODE – FMRKKM3M (optional, but much appreciated)

Simple Watercolor Technique for Crafting a Beautiful Warm Welcome Card

Watercolor painting is a fun and relaxing hobby that anyone can enjoy. There are many watercolor techniques to use and I’m sharing an easy, beginner-friendly one with you today. I created this card using a stamp set, a few inks, and a set of water painters.

Always use permanent, waterproof ink when stamping with watercolor. I like to use Stazon Jet Black ink. You will also want to use good watercolor paper that will not pill up when wet. I used the now-retired Shimmery White cardstock from Stampin’ Up! for this card but their Fluid 100 Watercolor Paper is also an excellent choice.

Product List
Warm Welcome Photopolymer Stamp Set (English)
Warm Welcome Dies
Jet Black Stāzon Ink Pad
Soft Suede Classic Stampin' Pad
Balmy Blue Classic Stampin' Pad
Smoky Slate Classic Stampin' Pad
Pumpkin Pie Classic Stampin' Pad
Basic White 8 1/2" X 11" Thick Cardstock
Pool Party 8-1/2" X 11" Cardstock
Poppy Parade 8-1/2" X 11" Cardstock
Shimmery White 8-1/2" X 11" Cardstock
Fluid 100 Watercolor Paper
Painted Texture 3 D Embossing Folder
Water Painters
Rustic Metallic Adhesive Backed Dots
Stampin' Cut & Emboss Machine
Stampin' Dimensionals

How to Make Your Own Sending Sunshine Greeting Card

Making cards is fun but sending them to brighten someone else’s day is delightful! Wouldn’t you love to receive a handmade card in the mail? Happy Mail is the best kind of mail!

The Sending Sunshine greeting card I made during today’s Coffee & a Card Livestream would brighten anyone’s day. Whatever kind of day you’re having, those rays of light are sure to bring encouragement!

The “Sending Sunshine and good feelings” sentiment works couples well with the Rays of Light stamp set.

I used a masking technique to shorten the stamped sentiment. This video replay from today’s Livestream demonstrates how I did that.

Product List
Rays Of Light Cling Stamp Set
Good Feelings Cling Stamp Set (English)
Basic Borders Dies
Jet Black Stāzon Ink Pad
Daffodil Delight Classic Stampin' Pad
Balmy Blue 8-1/2" X 11" Cardstock
Basic White 8 1/2" X 11" Cardstock
Brushed Brass Butterflies
Stampin' Cut & Emboss Machine
Stamparatus
Take Your Pick
Stampin' Seal
Stampin' Dimensionals

Make a Sweet Songbirds Thank-You Card

Spring has sprung here in Kansas City and has put me in the mood to make this Sweet Songbirds thank-you card. I used the Sweet Songbirds Bundle from Stampin’ Up! to create the card. I also used one of my favorite 6″ x 6″ paper collections, Regency Park.

Although I could have cut rectangles for the layers, I chose to use the Deckled Rectangle Dies to add some texture and a little more interest.

Product List
Iridescent Pearls
Iridescent Pearls

Make a Playing in the Rain Card using Paper Scraps

I’ve got another card to share with you today using paper scraps. I’ll admit it, I’m a paper hoarder and I need lots of ideas to use up my stash of cardstock. Today’s card uses 3/8″ x 5-1/4″ strips of cardstock, the Cloud Punch, and the Playing in the Rain Bundle from Stampin’ Up!

The background created with the paper strips, reminiscent of a rainbow, makes a great background for the clouds and kite die-cuts. Watch this video tutorial for full directions:

Product List
Playing In The Rain Bundle (English)
Night Of Navy Classic Stampin' Pad
Basic White 8 1/2" X 11" Thick Cardstock
Basic White 8 1/2" X 11" Cardstock
Cloud Punch
Mini Stampin' Cut & Emboss Machine
Multipurpose Liquid Glue
Stampin' Dimensionals

Use Paper Scraps to Make a Something Fancy Thank-You Card

Are you wondering what to do with all those designer series paper scraps? Use them! I’ve used eight, 1/2″ strips of paper scraps to create the card I’m sharing with you today.

The vibrant woven background created with the paper strips makes a great background and sets the stage for any sentiment tag.

Product List
Something Fancy Bundle (English)
Starry Sky Classic Stampin' Pad
2022–2024 In Color™ 6" X 6" (15.2 X 15.2 Cm) Designer Series Paper
Basic White 8 1/2" X 11" Thick Cardstock
Starry Sky 8 1/2" X 11" Cardstock
Basic White 8 1/2" X 11" Cardstock
Mini Stampin' Cut & Emboss Machine
Multipurpose Liquid Glue
Stampin' Dimensionals

Grateful for the Everyday Magic Decorative Borders Card

I used the Decorative Borders stamp set from Stampin’ Up! to make this sweet, wreath-themed card.

I used my favorite coloring tools, Stampin’ Blends, to color the beautiful line art image from the stamp set. The Petal Pink color was drawn from the Country Gingham Designer Series Paper I used as the first layer on the card.

The fun sentiment on the card is from the Something Fancy stamp set and was cut out using the coordinating Something Fancy Dies.

Not one to leave a card without an embellishment, I added a black baker’s twine bow and five Pastel Adhesive-Backed Sequins to finish the card.

Product List

Make a Share a Milkshake, Life is Sweeter with You, Fun-Fold Card

I used the Share a Milkshake Bundle from Stampin’ Up! to embellish the card I’m sharing with you today. Who doesn’t dream of floating ice cream dishes and strawberry milkshakes? You can’t get any sweeter than that!

The fun-fold technique I used appears a bit complicated but is actually quite simple when you use a paper trimmer that includes a scoring blade. I used this one from Stampin’ Up!

Here is a diagram showing the cutting and scoring I used to create this fun-fold card base:

Watch this video for complete cutting and scoring instructions:

Cutting & Scoring Guide

  • Card Base = 8″ x 5-1/2″
  • Designer Series Paper = two pieces 1-7/8″ x 5-1/4″ each, one piece 2-7/8″ x 1-7/8″, four pieces 1-7/8″ x 1″ each
  • Basic White = two pieces 1-5/8″ x 5″ each
  • Sentiment Tag -1-3/4″ x 3″
  • Scraps of Melon Mambo for heart die-cuts
  • Scraps of Basic White for ice cream and straw
Product List

Make a Beautifully Happy Thank-You Card

We’re almost halfway through the month of February – what? Sale-a-Bration will be going away in just a couple of weeks. If you’re new here, during the promotion you can choose a free Sale-a-Bration product with every $50 or $100 you spend. Read all about Sale-a-Bration here: https://bit.ly/40CPRwK

I created today’s card using the Beautifully Happy stamp set that I earned for free.

The Designer Series Paper I used for the card is a sneak peek of the Enjoy the Journey paper. The pack of 12″ x 12″ is available to customers as an Online Exclusive on March 1. Demonstrators were able to preorder the paper.

I send a free card tutorial to my email subscribers every Tuesday. This week subscribers received a card tutorial for this Valentine’s card and this sketch.

I used the same sketch to create today’s Beautifully Happy Thank-You Card. Did you notice how I changed things up from the sketch? Don’t miss one of my Fee Tutorial Tuesday emails! Sign up at this link: https://bit.ly/3l6KHJ1

Product List

Make an Adorable Owls Birthday Card with Free Products

I know a couple of fellas that are having birthdays this year and I cannot wait to give them this card I made today during my Make-it-Monday Livestream:

Isn’t that little hoot owl image from the Adorable Owls stamp set the cutest? The Adorable Owls stamp set from Stampin’ Up! is one of the free Sale-a-Bration products you can earn with a qualifying purchase through February.

Cutting & Scoring Guide

  • Card Base = 8-1/2″ x 5-1/2″ piece of Starry Sky cardstock scored at 2-1/8 and 4-1/4″ on the 8-1/2″ side.
  • Designer Series Paper = Two 2″ x 5-3/8″ pieces of Dainty Flowers Designer Series Paper
  • Scallop Circle = Cut scallop circle from 3″ x 3″ piece of Starry Sky cardstock
  • Stamped Circle = Cut circle from 3″ x 3″ piece of Basic White cardstock
  • Card Insert = 4″ x 5-1/4″ piece of Basic White cardstock
  • Sentiment Tag = 1/2″ x 3″ piece of Sweet Sorbet cardstock
  • Lable Punch = scrap of Sweet Sorbet cardstock
  • Numbers = scrap of Parakeet Party cardstock
Product List