All Occasion Cards

How to Make a Rocking Card

I’m rolling in to rock your world today by showing you how to make a rocking card!

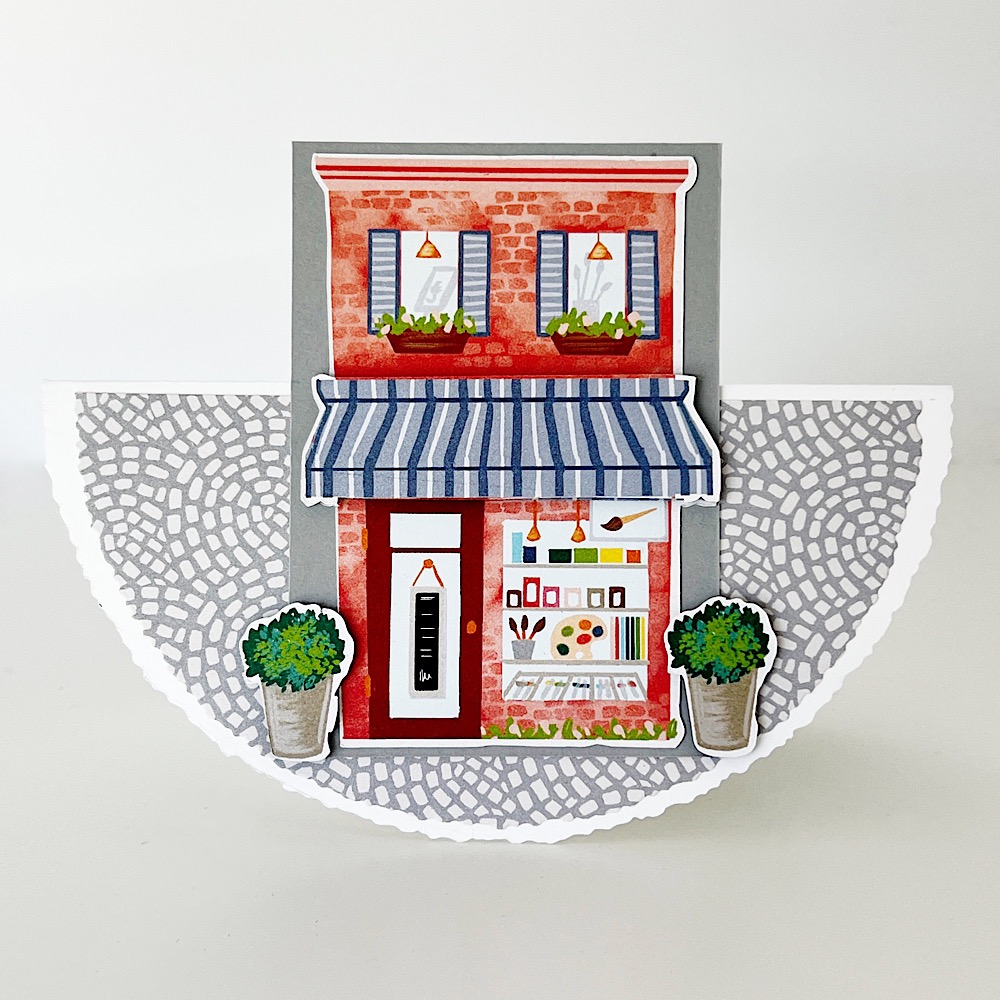
I’m eager to spotlight some of the retiring Stampin’ Up! products before they disappear for good. For today’s project, I incorporated the retiring Les Shoppes Designer Series Paper and the Daring Details Stamp Set.

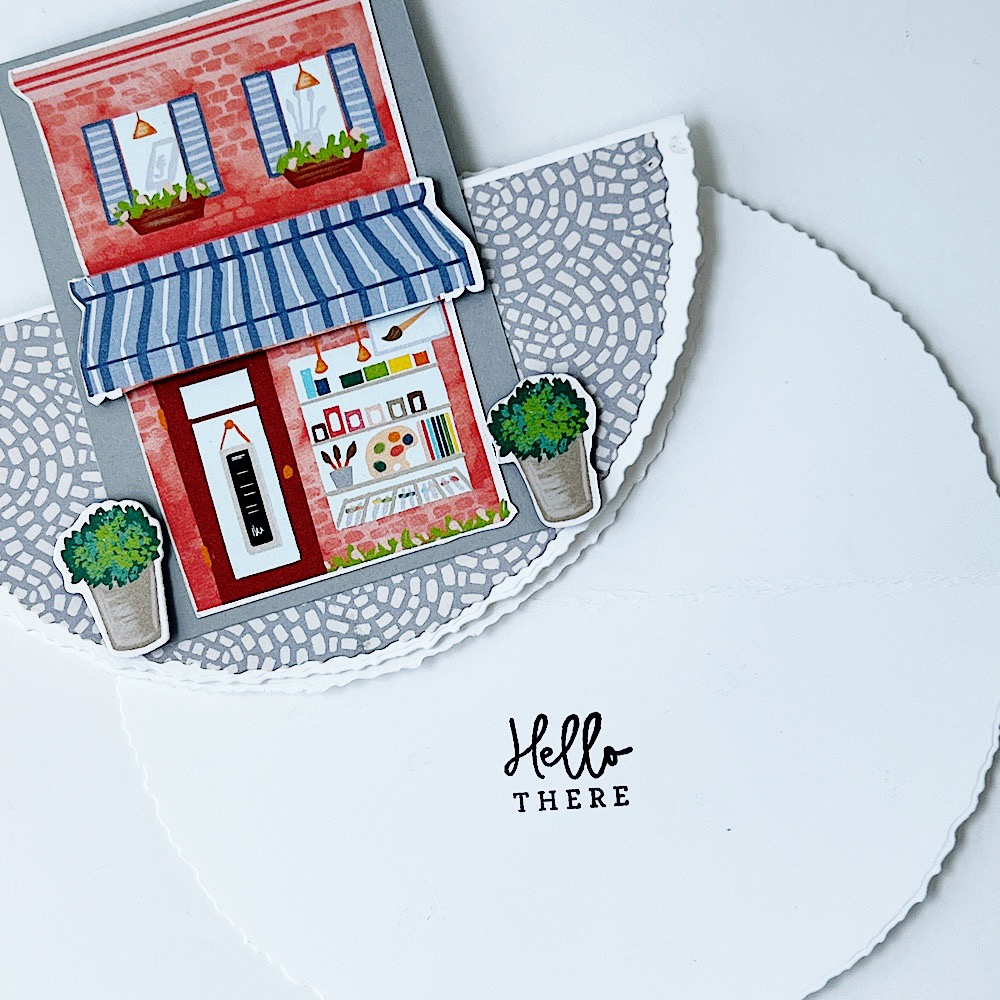
I fussy-cut the shop and planters directly from the Designer Series Paper to create full-color die-cuts for the card front. Additionally, I cut out another awning from the paper and adhered it over the shop die-cut using Stampin’ Dimensionals to give it dimension.

Cutting & Scoring Guide

  • Card Front = Cut a 5-3/8″ circle from a 6″ x 6″ piece of Thick Basic White Cardstock.
  • First Layer = Cut a 4-7/8″ circle from a 5-1/2″ x 5-1/2″ piece of Les Shoppes Designer Series Paper. Cut in half.
  • Rectangle Layer = 2-1/2″ x 3-5/8″ piece of Smoky Slate Cardstock
Product List

Make a Hooray for Surprises Interactive Card

Throughout February, I’ve been hosting virtual Monday Mini Card Classes, where I share fun and interactive cards. Catch up on the replays of this interactive card series by visiting: https://www.youtube.com/@ThePlaidPoodle/playlists

This week I demonstrated a card using the Hooray for Surprises Bundle from Stampin’ Up! The dies from the Hooray for Surprises Bundle create perforated edges with a tab. Simply pull the tab to reveal the message inside.

Product List

Interested in receiving a free project sheet of today’s card? Sign up for my Tuesday Tutorials! It’s free and easy to do, just hit up this link.

Don’t miss a Monday Mini Papercrafting Class episode – subscribe to my page or channel. Grab your coffee and hang out with me live next Monday! ☕️🎉

Facebook here: https://www.facebook.com/theplaidpoodle 

YouTube here: https://www.youtube.com/theplaidpoodle 

Make a Bright Skies Interactive Slider Card

If you’ve been following me for a bit you may know that I’ve been sharing various techniques for crafting interactive cards.

In today’s livestream, I showcased a slider card using the Bright Skies Bundle from Stampin’ Up! However, feel free to replicate this card using this easy technique with any crafting products you may already have.

When you pull the slider insert, the sun on the card front rises and the sentiment magically appears!

The slider card is easy to create using a paper trimmer – no special dies needed. For a step-by-step demonstration, feel free to watch the replay of today’s mini card-making class below to see how I make this fun card!

Product List
Bright Skies Bundle (English)
Hooray For Surprises Photopolymer Stamp Set (English)
Crushed Curry Classic Stampin' Pad
Poppy Parade Classic Stampin' Pad
Basic Gray Classic Stampin' Pad
Sunny Days 12" X 12" (30.5 X 30.5 Cm) Designer Series Paper
Pool Party 8-1/2" X 11" Cardstock
Basic White 8 1/2" X 11" Cardstock
Paper Trimmer
Bone Folder
Take Your Pick
Stampin' Pierce Mat
Silicone Craft Sheet
Stampin' Cut & Emboss Machine
Tear & Tape Adhesive
Stampin' Dimensionals
Multipurpose Liquid Glue

Interested in receiving a free project sheet of today’s card? Sign up for my Tuesday Tutorials! It’s free and easy to do, just hit up this link.

Don’t miss a Monday Mini Papercrafting Class episode – subscribe to my page or channel. Grab your coffee and hang out with me live next Monday! ☕️🎉

Facebook here: https://www.facebook.com/theplaidpoodle 

YouTube here: https://www.youtube.com/theplaidpoodle 

Make an Interactive Easter Card

Welcome to the first Monday of February, marking the beginning of a new theme for my Monday Mini Card-Making Livestreams! Throughout this month, I’ll be demonstrating various techniques for crafting interactive cards.

In today’s livestream, I showcased an Easter card featuring the adorable Easter Bunny stamp set and Bunny Punch from Stampin’ Up! However, feel free to replicate this card using the showcased technique with any crafting products you may already have.

When you open the card, this sweet ink-blended bunny magically pops up, adding an extra touch of charm and creativity to the card.

The pop-up insert is easy to create using a paper trimmer or scissors. For a step-by-step demonstration, feel free to watch the replay of today’s mini card-making class below to see how I make this charming Easter card come to life!

Product List

Interested in receiving a free project sheet of today’s card? Sign up for my Tuesday Tutorials! It’s free and easy to do, just hit up this link.

Don’t miss a Monday Mini Papercrafting Class episode – subscribe to my page or channel. Grab your coffee and hang out with me live next Monday! ☕️🎉

Facebook here: https://www.facebook.com/theplaidpoodle 

YouTube here: https://www.youtube.com/theplaidpoodle 

Make a Thank-You Card using Ink-Blending with Embossing Folders

Today marks the conclusion of my series on ink-blending techniques! Throughout my free Monday Mini Papercrafting Classes, I’ve shared various methods involving ink-blending. We started the series with an emboss/resist technique, followed by a masking technique, and last week, I shared how to ink-blend with stencils.

Today I shared how to ink-blend with embossing folders. Here is the card I made using the technique.

You may watch the replay of today’s mini card-making class here:

Product List
Darling Details Bundle
Perennial Postage Cling Stamp Set (English)
Countryside Blossoms Embossing Folder
Night Of Navy Classic Stampin' Pad
Granny Apple Green Stampin' Pad
Bubble Bath Classic Stampin' Pad
Boho Blue 8 1/2" X 11" Cardstock
Basic White 8 1/2" X 11" Cardstock
Blending Brushes
Small Blending Brushes
Stampin' Cut & Emboss Machine
Stampin' Seal
Multipurpose Liquid Glue
Stampin' Dimensionals

Interested in receiving a free project sheet of today’s card? Sign up for my Tuesday Tutorials! It’s free and easy to do, just hit up this link.

Don’t miss a Monday Mini Papercrafting Class episode – subscribe to my page or channel. Grab your coffee and hang out with me live next Monday! ☕️🎉

Facebook here: https://www.facebook.com/theplaidpoodle 

YouTube here: https://www.youtube.com/theplaidpoodle 

Make a Friendship Card using Ink-Blending & Stencils

I’m thrilled to share one of my all-time favorite ink-blending techniques with you! Today, during my free Monday Mini Papercrafting Class I demonstrated how to use ink-blending with stencils. Here is the card we made during class using the technique.

I even included some ink-blending on the inside of the card. It’s just a simple touch that adds a lot of interest.

You can watch the Mini Card-Making Class replay here:

Product List

Interested in receiving a free project sheet of today’s card? Sign up for my Tuesday Tutorials! It’s free and easy to do, just hit up this link.

Don’t miss a Monday Mini Papercrafting Class episode – subscribe to my page or channel. Grab your coffee and hang out with me live next Monday! ☕️🎉

Facebook here: https://www.facebook.com/theplaidpoodle 

YouTube here: https://www.youtube.com/theplaidpoodle 

How to Use Masks for Flawless Ink-Blending

I’m thrilled to share one of my all-time favorite ink-blending techniques with you! Today, during my free Monday Mini Papercrafting Class I demonstrated how to use ink-blending with masks. It’s a simple card design and perfect for beginning card makers! Here is the card we made during class using the technique.

You may watch the replay of today’s class here:

Product List

Interested in receiving a free project sheet of today’s card? Sign up for my Tuesday Tutorials! It’s free and easy to do, just hit up this link.

Don’t miss a Monday Mini Papercrafting Class episode – subscribe to my page or channel. Grab your coffee and hang out with me live next Monday! ☕️🎉

Facebook here: https://www.facebook.com/theplaidpoodle 

YouTube here: https://www.youtube.com/theplaidpoodle 

Make an Easy Interactive Card

I’m not monkeying around with today’s card! I used a wobble spring to adhere the monkey to the card front creating a fun, interactive card. The wobble spring causes that cute monkey to bounce on the card.

The wobble springs are not expensive and are fun to use on all types of projects! I purchased my springs from Amazon.

Product List

Make a So Refreshing Double Z-Fold Card

So I did a thing. On Friday I was the guest crafter on Craft Roulette. The project we made was a Z-fold card. Here is the card I made during the show:

You may ask, “Why did you add the knitting sheep to your card?”. It doesn’t seem to make much sense, does it? Once you watch the episode you will understand. You can watch it by clicking on this link: https://www.youtube.com/live/n2l924Qdy08?feature=share

Making that z-fold card lit a fire under me to create a double z-fold card so that is what I did during today’s Make-it-Monday livestream. I used the So Refreshing Bundle from Stampin’ Up! to create the card.

Cutting & Scoring Guide

  • Card Base = 11″ x 4-1/4″ piece of cardstock scored at 2-3/4″ and 5-1/2″.
  • Double Z-Fold = 11″ x 1-1/2″ piece of cardstock scored at 2-3/4″ and 5-1/2″
  • Designer Series Paper = 4″ x 5-1/4″, two pieces 2-1/2″ x 4″ each, 1-1/4″ x 10-3/4″
  • Circle Die-Cut = 3-1/2″ x 3-1/2″
  • Sentiment Tag = 5/8″ x 2-1/2″
Product List

Creative Ideas to Transform Your Welcome Inn Paper Pumpkin Kit

Here’s an alternative project I made using the June 2023 Welcome Inn Paper Pumpkin Kit. It’s a fun-fold card using elements from the kit. I loved the printed card bases in this kit! To find out more about Paper Pumpkin and how to obtain a kit click here.

I used parameters from last week’s #craftroulettechallenge to create the card. Are you familiar with Craft Roulette? It’s a weekly live show featuring improvised crafting, special guests, community contributions, tons of prizes, and much, much more! The Craft Roulette wheel decides what the project will be and what elements to use. The parameters for this card were:

  • Project = 2 Folds
  • Colors = Planter
  • Element = Happy Face
  • Random = An Old Product

I think I nailed it with my 2-fold fun-fold card, Calypso Coral color, old brad and baker’s twine and the happy face I stamped with the sentiment inside the card.

I’ll be a guest crafter on Craft Roulette this Friday, July 14, and would love for you to join us. Cheer me on and create your own project! Find out all about it by clicking on this link then plan to watch it Friday at 6:30 pm CT: https://craftroulette.live/

Video Tutorial

Everything You Need to Know About Making a DIY Matchbook Card

I’m using the parameters given in Episode 162 of Craft Roulette to create my project today. What is Craft Roulette? It is a live papercraft challenge show where the goal is to create a project that has been randomly selected by the spin of a wheel. You can catch live episodes every Friday night at 6:30 CT here: https://www.youtube.com/@CraftRoulette

Can you guess what the parameters from the show were by looking at my finished card?

If you guessed matchbook card, flowering field colors, a bird element, and a random wood grain you would be correct!

Cutting & Scoring Guide

  • Card Base = 11″ x 4-1/4″ Basic White cardstock scored at 4-3/4″ and 10″ on the 11″ side
  • Basic Black Cardstock = 4″ x 4″ and 4-1/8″ x 7/8″
  • Real Red Cardstock = 4″ x 3/4″ and 3-1/2″ x 1-1/4″
  • Designer Series Paper = 1-3/4″ x 3-1/2″
  • Crushed Curry Cardstock = 2-1/2″ x 1-1/2″
  • Basic White = 3-7/8″ x 1/2″ (sentiment tag), 3″ x 3″ (circle die-cut), and scraps for stamped images

I demonstrated my process for making this card on today’s Coffee & a Card Livestream. I mentioned in the video that I would probably add some flowers to better meet the Craft Roulette parameters and that is what I did using a stamp and die from the Playing in the Rain stamp set and dies.

Product List

Learn Some Helpful Tips & Tricks for Making a Lattice Card

I ‘ve been seeing handmade lattice cards all over the internet and until now have been hesitant to give it a try. During a recent get together with some crafty card friends, one of them shared with me how to easily make a lattice card.

To keep the lattice on the card straight and square we used the grid paper from Stampin’ Up! and a hand-crafted “spacer”. Watch the replay of my Coffee & a Card Livestream for step-by-step directions.

Cutting/Scoring Guide

  • Card Base = 11″ x 4-1/4″ piece of Thick Basic White cardstock scored at 5-1/2″. Fold on the score line then cut 3″ off the front flap of the card front.
  • Lattice = two 1/2″ x 5″ pieces of Thick Basic White cardstock, four 1/2″ x 4-1/4″ pieces of Thick Basic White cardstock.
Product List

Get Ready for the ’23-‘Stampin’ Up! Annual Catalog: Sneak Peek of the Best Samples

The day we’ve been waiting for is finally here. The Stampin’ Up! ‘23-‘24 is live today! Sales from the new catalog begin today!

The Fresh as a Daisy Suite from the new catalog is one of my favorites. I cased this card from New Zealand demonstrator Jan Clotheir using products from the suite.

I shared several project samples using products from the new catalog in today’s Livestream. Watch the replay here:

The online version of the catalog can be seen here on my Catalog Page Here.

SHOP ONLINE 24/7 HERE – https://bit.ly/3noFXQs

HOST CODE – FMRKKM3M (optional, but much appreciated)

Simple Watercolor Technique for Crafting a Beautiful Warm Welcome Card

Watercolor painting is a fun and relaxing hobby that anyone can enjoy. There are many watercolor techniques to use and I’m sharing an easy, beginner-friendly one with you today. I created this card using a stamp set, a few inks, and a set of water painters.

Always use permanent, waterproof ink when stamping with watercolor. I like to use Stazon Jet Black ink. You will also want to use good watercolor paper that will not pill up when wet. I used the now-retired Shimmery White cardstock from Stampin’ Up! for this card but their Fluid 100 Watercolor Paper is also an excellent choice.

Product List
Warm Welcome Photopolymer Stamp Set (English)
Warm Welcome Dies
Jet Black Stāzon Ink Pad
Soft Suede Classic Stampin' Pad
Balmy Blue Classic Stampin' Pad
Smoky Slate Classic Stampin' Pad
Pumpkin Pie Classic Stampin' Pad
Basic White 8 1/2" X 11" Thick Cardstock
Pool Party 8-1/2" X 11" Cardstock
Poppy Parade 8-1/2" X 11" Cardstock
Shimmery White 8-1/2" X 11" Cardstock
Fluid 100 Watercolor Paper
Painted Texture 3 D Embossing Folder
Water Painters
Rustic Metallic Adhesive Backed Dots
Stampin' Cut & Emboss Machine
Stampin' Dimensionals

How to Make Your Own Sending Sunshine Greeting Card

Making cards is fun but sending them to brighten someone else’s day is delightful! Wouldn’t you love to receive a handmade card in the mail? Happy Mail is the best kind of mail!

The Sending Sunshine greeting card I made during today’s Coffee & a Card Livestream would brighten anyone’s day. Whatever kind of day you’re having, those rays of light are sure to bring encouragement!

The “Sending Sunshine and good feelings” sentiment works couples well with the Rays of Light stamp set.

I used a masking technique to shorten the stamped sentiment. This video replay from today’s Livestream demonstrates how I did that.

Product List
Rays Of Light Cling Stamp Set
Good Feelings Cling Stamp Set (English)
Basic Borders Dies
Jet Black Stāzon Ink Pad
Daffodil Delight Classic Stampin' Pad
Balmy Blue 8-1/2" X 11" Cardstock
Basic White 8 1/2" X 11" Cardstock
Brushed Brass Butterflies
Stampin' Cut & Emboss Machine
Stamparatus
Take Your Pick
Stampin' Seal
Stampin' Dimensionals