Monthly Archive: May 2017

Swirly Bird Father’s Day Card

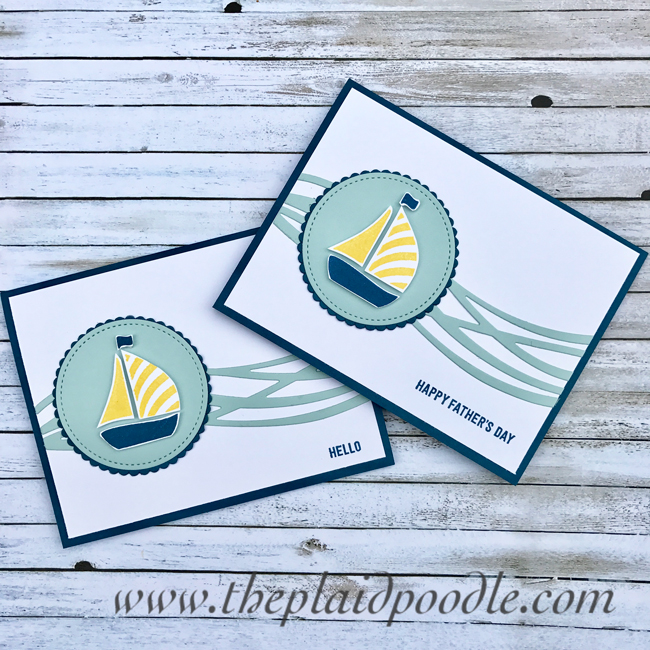
The calendar is fast approaching to the month of June and that got me thinking about Father’s day.  That in turn got me thinking about making some masculine cards.  Today’s card is full of whimsy and soft colors.  It’s not one you would traditionally think of as a masculine card but it works.  It’s another card that could be used for all sorts of different occasions just by changing up the greeting.

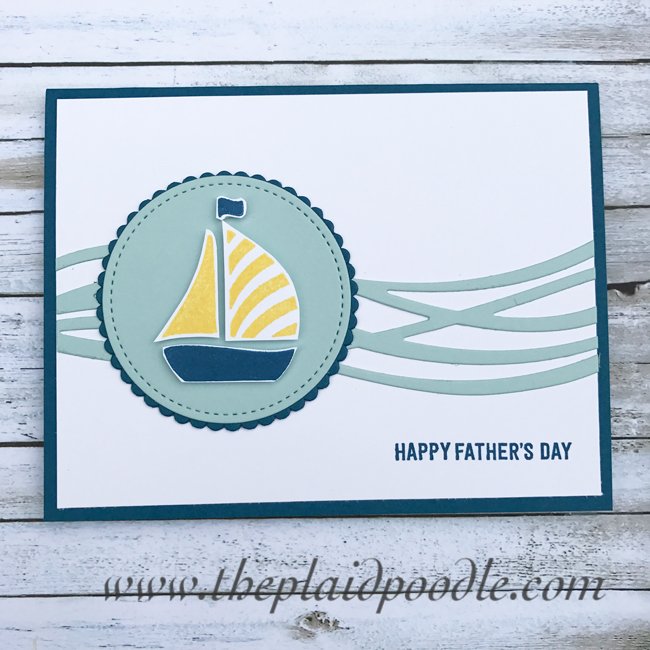
Blue and yellow are classic colors that coordinate so well with each other.  This card pairs Dapper Denim and Soft Sky with Daffodil Delight.  The sailboat images require some fussy cutting but it’s not too cumbersome.  Using die-cuts for the rest of the card makes it a quick and easy card to put together.  Here is my video tutorial:

Project Dimensions:

  • Card Base = 8-1/2″ x 5-1/2″ piece of Dapper Denim card stock scored at 4-1/4″ then folded in half.
  • Whisper White card stock:  4″ x 5-1/4″, 3-1/2″ x 2-3/4″
  • Dapper Denim card stock:  3-1/2″ x 3-1/2″
  • Soft Sky card stock:  3-1/2″ x 3-1/2″

Product List

Thanks so much for stopping by my Blog today!  I would love to hear your thoughts so let me know what you think of my card by leaving a comment below.

Save

Paper Pumpkin Sprinkled with Love

Each month in my Paper Pumpkin kit, I receive a brand new exclusive stamp set to add to my collection.  It’s  one of my favorite things about Paper Pumpkin.  Here is a card I created with a stamp and a few left-over embellishments from this month’s kit:

If you’re wondering how I made that little chocolate donut here is a video tutorial:

Card Dimensions:
  • Card base = 8-1/2″ x 5-1/2″ piece of Crumb Cake card stock scored at 4-1/4″ then folded in half on the score line.
  • Donut:  2-1/2″ piece of Chocolate Chip card stock, 2-1/2″ piece of Powder Pink card stock
  • Tag:  1-1/4″ x 5-1/4″ piece of Powder Pink card stock, 1″ x 4-3/4″ piece of Whisper white card stock

Product List

If you haven’t heard of Paper Pumpkin, it’s a subscription kit by Stampin’ Up!  With Paper Pumpkin, you’ll save time and money while you build a collection of crafting supplies. Every month you’ll receive a unique stamp set with an ink spot (that won’t repeat a color in a 12-month period). In no time at all, you’ll have a variety of stamps and ink to use on other projects. In addition, your first kit includes a free clear stamping block that you’ll use every month.

Now is a great time to give Paper Pumpkin a try.  First-time subscribers who subscribe by June 10th get the June, July, and August kits at 25% off.  Want to add a little creativity to your life?  Click on the little orange box below to subscribe now and don’t forget to use the promo code STARTHERE to save 25% off!


Save

Save

Save

Save

Envelope Punch Board Envelopes & Liners

In yesterday’s post I shared a 4-1/4″ x 4-1/4″ square card.  I made a square envelope with a liner that coordinated with my card using the Envelope Punch Board by Stampin’ Up!  I used simple printer paper for the envelope and a piece of Blooms and Bliss Designer Series Paper for the envelope liner.

Here is a quick video tutorial that includes a tip to estimate what size Designer Series Paper your envelope requires for a liner:

Product List

Save

Save

Stampin’ Up! Banners for You Card

I decided to think outside-the-box today by creating a square card. (Did you see what I did there?)  I’ve been going through my Designer Series Paper listed on the Stampin Up! Retiring List to make room for new, and the beautiful colors and impressionistic style of my selection from the Blooms and Bliss Designer Series Paper called to me.  The blues and greens in this paper combined with the Island Indigo card base look fantastic!


The Delicate White Doily helps to highlight the tag and Detailed Dragonflies, and the Silver Metallic Thread adds more depth and a little shine to the card.  I’ll be posting a video soon on how I created the coordinating envelope.  Subscribe to my YouTube Channel HERE so you don’t miss an episode.

The card has a lot of elements but is actually very simple and quick to put it together.  Here is my video tutorial:


To create the card base I cut an 8-1/2″ x 4-1/4″ piece of Island Indigo card stock, scored it at 4-1/4″ then folded it in half.  The Designer Series Paper is cut at 4″ x 4″ which means you can make nine of these cards out of one 12″ x 12″ piece of paper!  The “Congrats” tag is stamped onto a piece of 1-1/2″ x 3-1/2″ piece of Whisper White card stock and the dragonflies are cut from a piece of 4-3/4″ x 2-3/4″ piece of Island Indigo card stock.  I cut a piece of 4″ x 4″ piece of Whisper White card stock for the card insert.


Product List

Save

Save

Save

Save

Save

Save

Save

Save

Save